
Look, I've seen it a thousand times. Someone gets fired up about building their dream home gym, drops serious cash on floor to ceiling gym equipment, and then... disaster. Either the setup doesn't work, the equipment damages their space, or they end up with an expensive coat rack that collects dust.
Here's the brutal truth: most people screw up their floor-to-ceiling gym setup before they even install it. And it's costing them gains, money, and sanity.
But here's the good news: every single one of these mistakes is fixable. Whether you're a CrossFit athlete looking to create a serious training space, a gymnast who needs equipment that won't destroy your rental, or a calisthenics practitioner who's tired of cramped workout conditions, this guide will save you from the most common (and expensive) floor-to-ceiling gym equipment mistakes.
Let's get into it.
Mistake #1: Ignoring Your Ceiling Height Reality
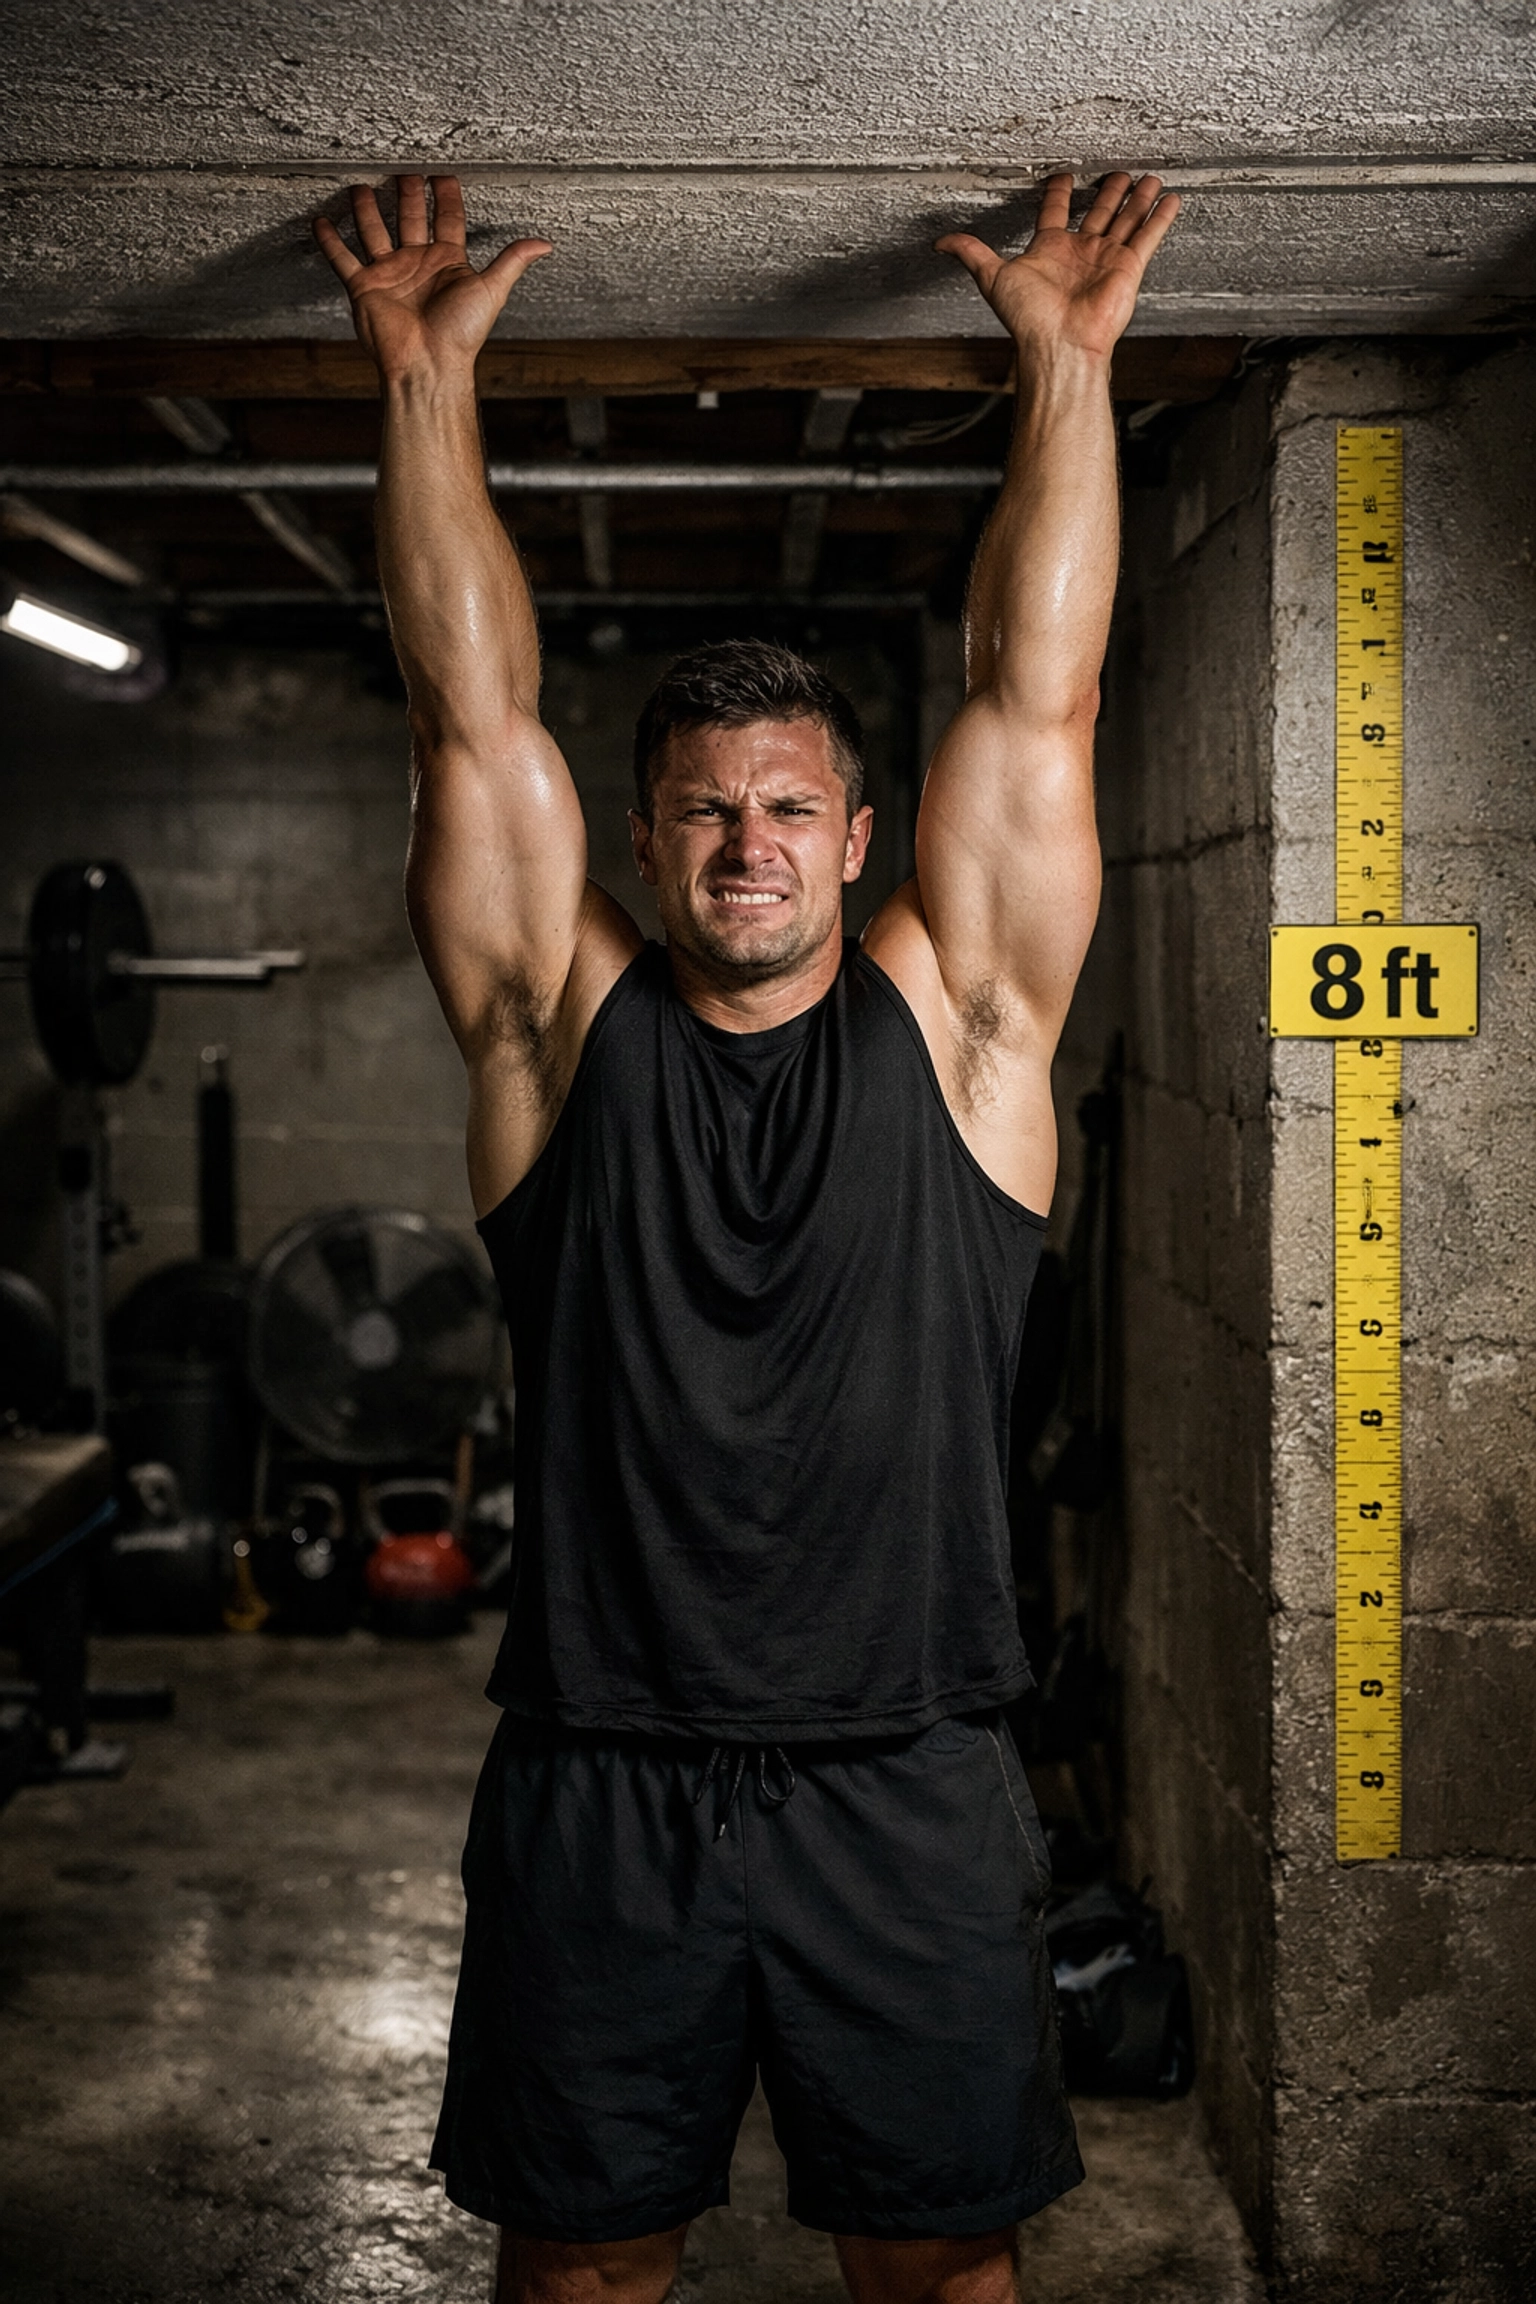
This is the big one. You see some sick pull-up rig online, imagine yourself crushing muscle-ups in your garage, and hit "buy now" without measuring a damn thing.
Then it arrives, and you realize your 8-foot ceiling means you're going to knock your head every single time you kip. Or worse: you can't even fully extend your arms overhead.
The Problem: Standard ceiling heights in most homes range from 8 to 9 feet. Add a 2-inch mat for safety, and you've lost another few inches. When you factor in your height plus arm reach, traditional mounted equipment becomes a nightmare. For serious athletes training for ninja warrior competitions or working on advanced gymnastics movements, this isn't just inconvenient: it's a dealbreaker.
The Fix: Before you buy anything, grab a tape measure and do the math. Stand on your mat (if you're using one) and reach up. How much clearance do you have? For most bodyweight training at home, you need at least 6-8 inches of clearance above your full reach for comfortable movement.
Better yet, consider a no wall damage workout system that uses tension-based mounting instead of rigid fixtures. Systems like the Resistance Rail from Bold Body Fitness are designed specifically to work with lower ceilings while still providing legit resistance training options. The adjustable height means you're not locked into a fixed position that doesn't work for your space.
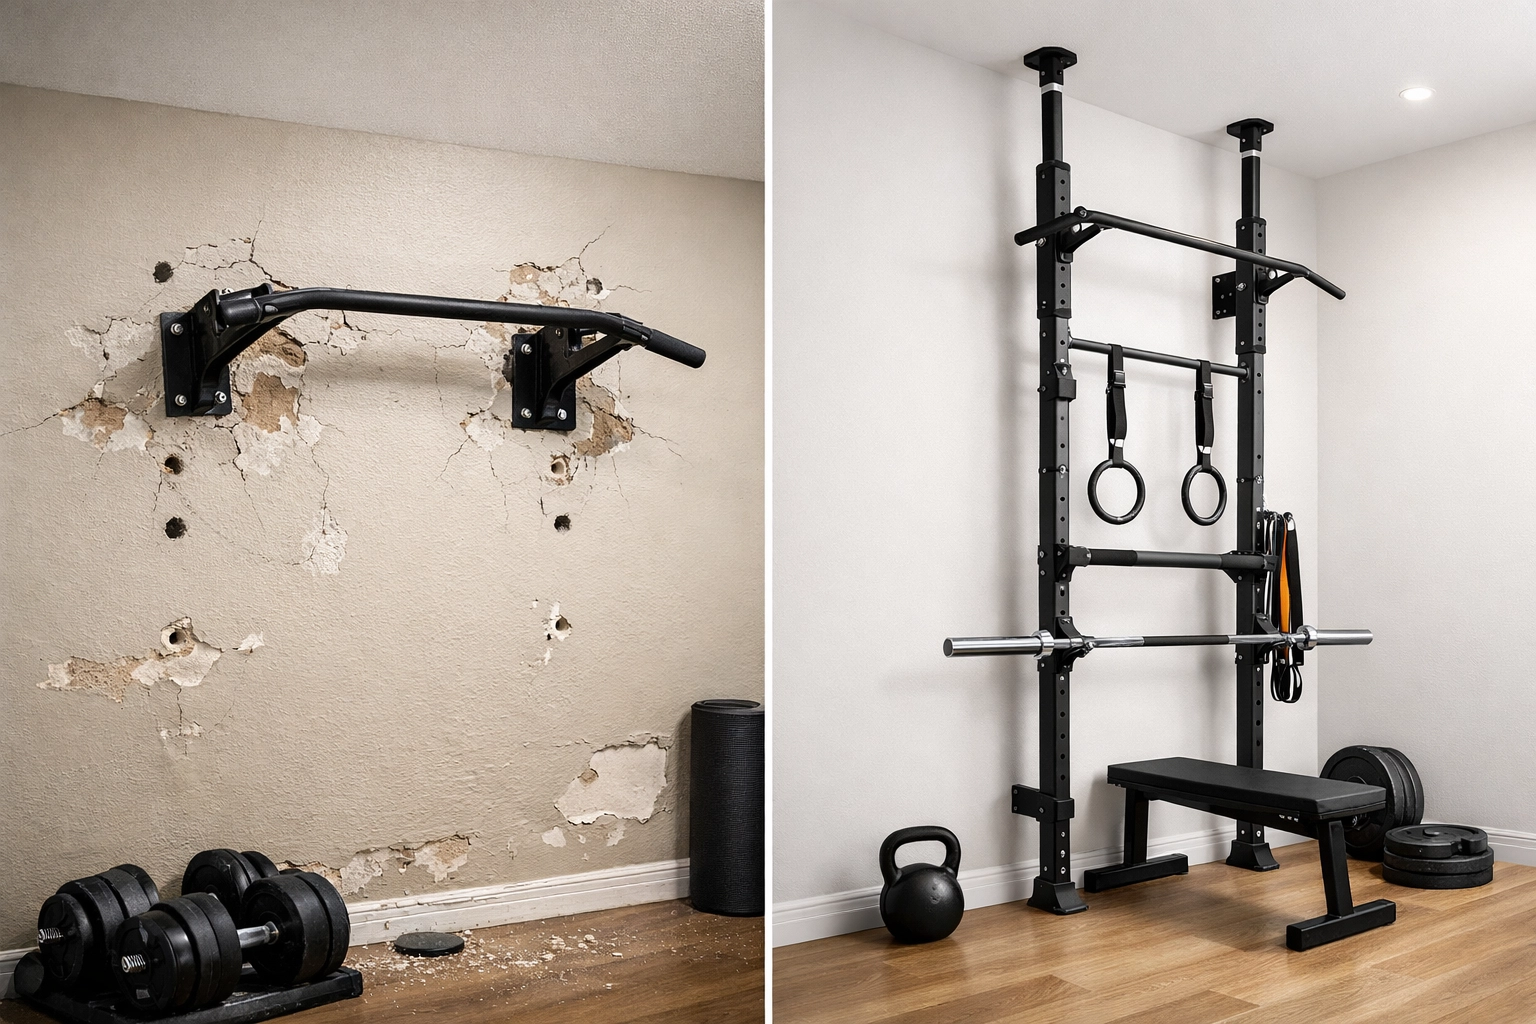
Mistake #2: Drilling First, Thinking Later (Wall Damage)
Let me paint you a picture: You're pumped about your new home gym. You grab your drill, find what you think is a stud, and start mounting your pull-up bar. Three months later, you're moving apartments, and suddenly you're on the hook for hundreds in drywall repair.
The Problem: Traditional wall-mounted equipment requires drilling into studs, which means permanent holes, potential structural concerns, and zero flexibility. For renters, this is a non-starter. For homeowners, it means committing to a layout you might want to change later. And here's something most people don't think about: not all walls can support the dynamic loads created by serious training.
MMA fighters throwing knees on a heavy bag, CrossFit athletes doing butterfly pull-ups, or gymnasts working ring skills create forces that go way beyond static weight ratings. One wrong installation and you're pulling your equipment: along with chunks of your wall: right off the studs.
The Fix: Prioritize floor-to-ceiling systems that use pressure mounting or freestanding designs. These versatile home gym solutions let you train hard without turning your walls into Swiss cheese.
The beauty of a proper floor to ceiling gym setup is that it distributes force vertically between your floor and ceiling joists: the strongest structural points in your room: rather than relying on wall studs that might not be where you need them. At Bold Body Fitness, we built our equipment specifically for people who need serious training capability without permanent installation.
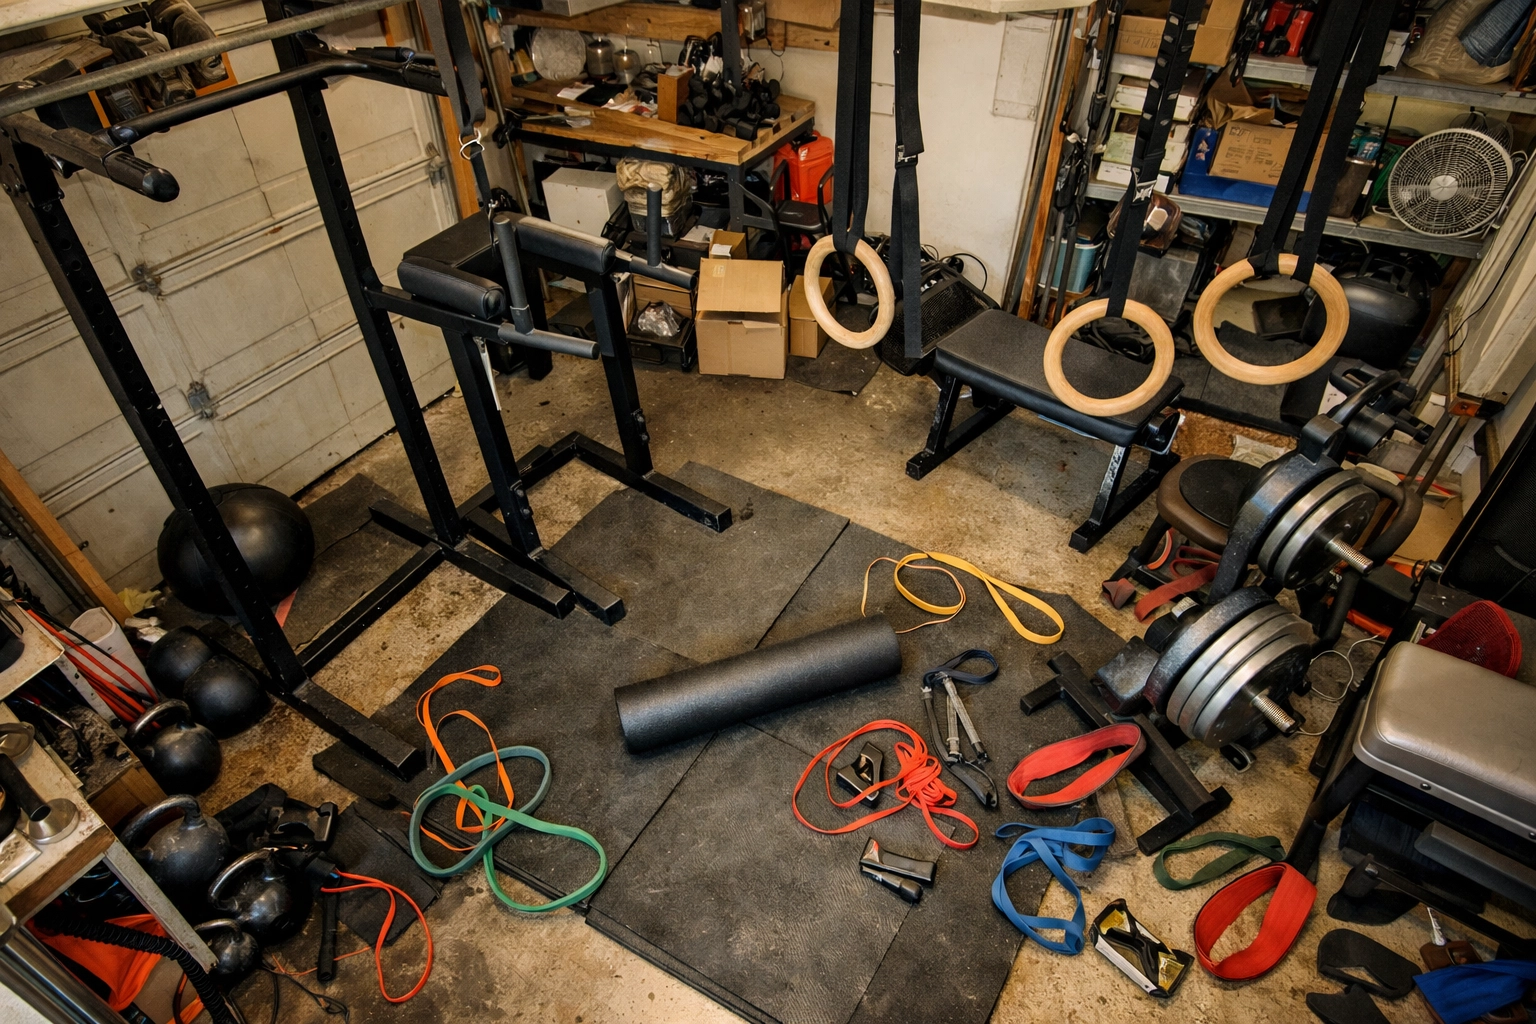
Mistake #3: Buying Single-Purpose Equipment (The Space Waster)
Here's where people really blow their budget and their square footage. They buy a pull-up bar. Then they need dip bars. Then they want somewhere to hang rings. Before you know it, half their garage is filled with equipment that each does exactly one thing.
The Problem: Single-purpose machines and fixed equipment create massive space inefficiency. You're not a commercial gym: you can't dedicate 500 square feet to your training area. And when you're limited on space, every piece of equipment needs to earn its place by offering multiple training options.
For calisthenics practitioners who need to progress from basic pull-ups to advanced skills like front levers and muscle-ups, or CrossFit athletes who want to mix pulling work with core training, having separate pieces of equipment for each movement is impractical.
The Fix: Invest in calisthenics equipment for home that offers serious versatility. Look for systems where you can:
- Adjust grip positions for different exercises
- Add resistance bands for assistance or additional challenge
- Modify height for various movements
- Progress from beginner to advanced on the same core structure
This is where a properly designed floor to ceiling gym shines. Instead of cluttering your space with five different pieces of equipment, one well-designed system becomes your pull up bar alternative, your core training station, your suspension training anchor, and your muscle-up practice rig all in one.
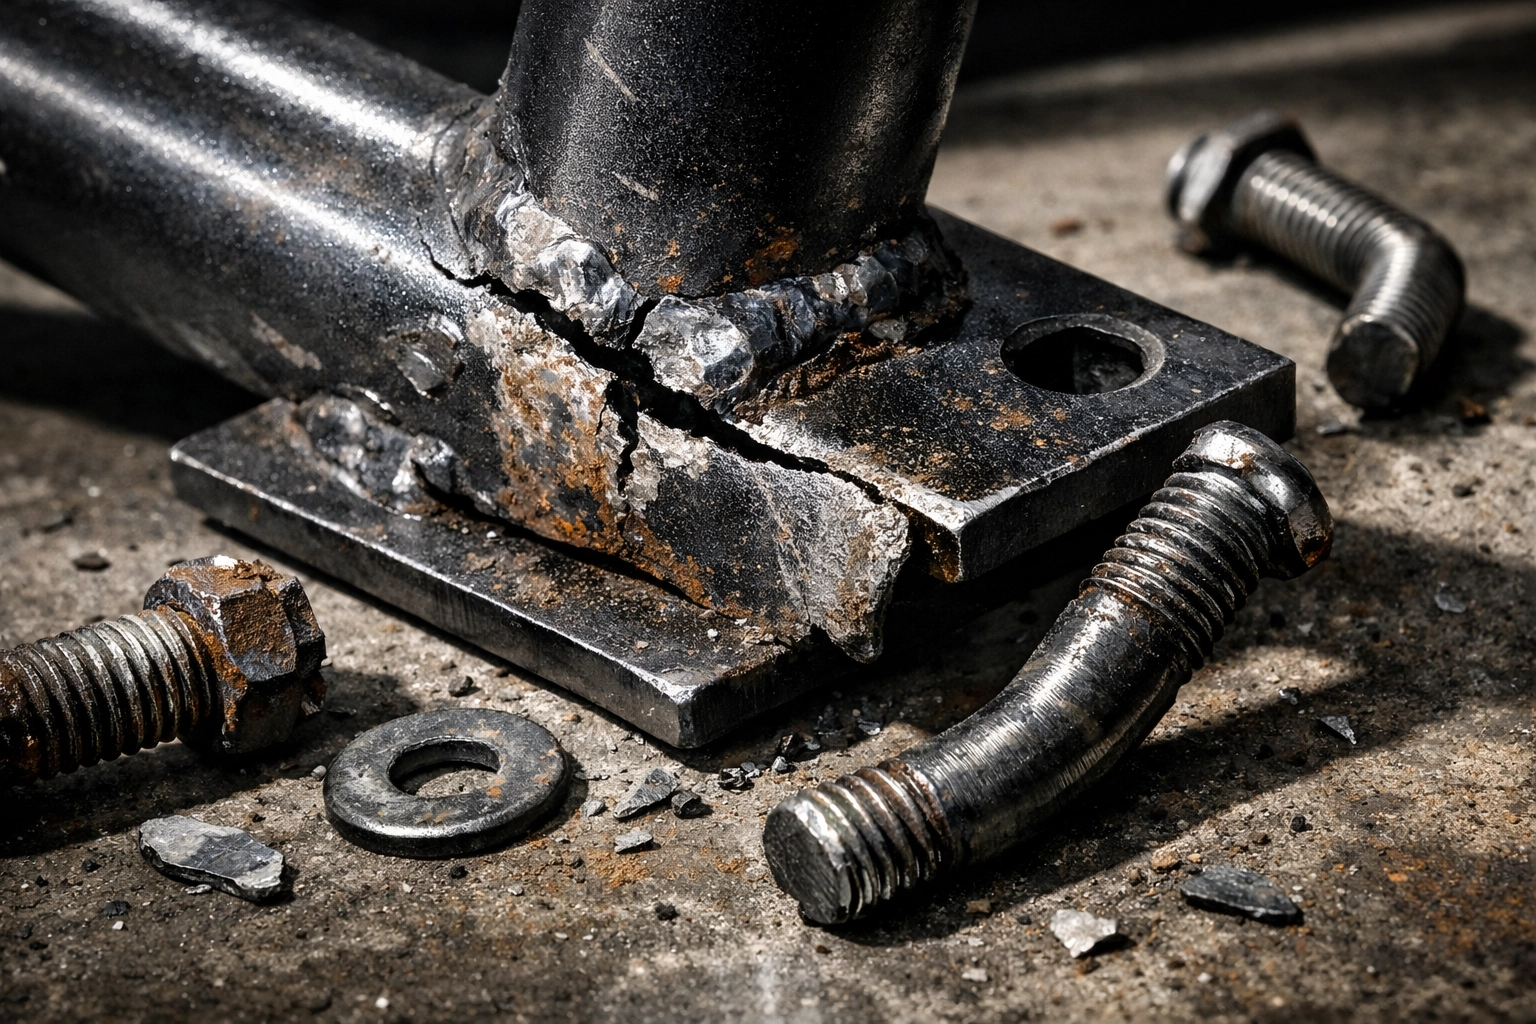
Mistake #4: Cheap Equipment That Breaks (False Economy)
"I'll just buy the budget version and upgrade later if I need to."
Famous last words.
The Problem: Cheap equipment breaks. And when it breaks during a max effort pull-up or a heavy swing, you're not just out the money: you're risking serious injury. Welds crack, bolts shear, and components seize up. I've seen CrossFit home gym setups where the paint starts flaking off after two weeks, or where the "heavy-duty" mounting system can't handle actual dynamic movements.
For serious athletes: whether you're a gymnast training skills or an MMA fighter building pulling strength: equipment failure isn't just frustrating. It's dangerous.
The worst part? You end up spending more in the long run. You buy cheap, it breaks, you buy cheap again, it breaks again, and finally you buy quality equipment after wasting hundreds on junk.
The Fix: Buy once, cry once. Invest in equipment from reputable manufacturers who understand the forces involved in serious resistance training. Check for:
- Steel gauge and construction quality
- Weight ratings that exceed your needs (with safety margin)
- Reviews from actual athletes, not just casual exercisers
- Warranty coverage that shows the company stands behind their product
Quality floor to ceiling gym equipment isn't cheap, but it's infinitely cheaper than medical bills, replacement costs, and the lost training time when your equipment fails. Check out our shop for equipment that's built to handle the punishment serious athletes dish out.
Mistake #5: Ignoring Your Flooring (The Foundation Failure)
You wouldn't build a house on sand, right? So why are people setting up serious training equipment on carpet or bare concrete without any protection?
The Problem: Your flooring affects everything: stability, noise, equipment longevity, and safety. Carpet creates uneven surfaces that compromise machine balance. It also absorbs moisture and odor (trust me, your gym is going to smell). Bare concrete is hard on dropped equipment and murder on your joints if you're doing any floor work.
For ninja warriors practicing landing techniques or CrossFit athletes doing box jumps, the wrong flooring isn't just inconvenient: it's a training limitation and an injury risk.
The Fix: Start with proper flooring before you install anything else:
- Rubber gym mats (3/8" to 3/4" thick) provide excellent protection and stability
- Hardwood or engineered wood works well for calisthenics and bodyweight work
- Interlocking foam tiles are good for budget setups, though less durable
Make sure your flooring is level. Even a slight slope affects your equipment's stability and can throw off your movement patterns. Use a level to check your floor before installation, and don't be afraid to use shims or leveling feet to compensate.
Mistake #6: Skipping the Measurement Phase (Space Planning Disaster)
"Eyeballing it" is not a measurement strategy. Yet people constantly order equipment based on guessing their space dimensions, and then act surprised when it doesn't fit.
The Problem: Inadequate space planning leads to cramped workouts, equipment that can't be used properly, and dangerous clearance issues. You need to account for:
- Equipment dimensions (including any parts that extend during use)
- Your own movement space around the equipment
- Clearance for swinging, kipping, or dynamic movements
- Storage space for accessories (bands, rings, chalk, etc.)
- Room for future equipment additions
For full body workout at home routines, you need enough space to move freely through exercises without constantly adjusting or repositioning. Gymnasts need landing zones. CrossFit athletes need room to bail on movements safely.
The Fix: Measure everything. And I mean everything:
- Room dimensions: Measure corner to corner AND floor to ceiling
- Equipment footprint: Check manufacturer specs for actual dimensions
- Movement space: Add 2-3 feet of clearance on each side where you'll be moving
- Door clearances: Make sure you can actually get the equipment into your space
- Obstacle locations: Note where outlets, vents, and fixtures are
Create a simple floor plan (even a sketch works) before you buy. This 20 minutes of planning will save you hours of frustration and potentially hundreds in return shipping costs.
Mistake #7: Creating a Sweatbox (Ventilation Neglect)
Last but definitely not least: ventilation. People get so focused on equipment that they forget they're going to be working hard in this space, generating heat and moisture.
The Problem: Poor ventilation turns your home gym into a miserable sauna. And not the good kind: the kind where you're breathing stale, humid air while trying to hit a PR. Beyond comfort, inadequate ventilation leads to:
- Equipment rust and corrosion (especially on steel components)
- Mold and mildew growth on mats and walls
- Unpleasant odors that permeate your entire home
- Reduced training performance due to overheating
Try grinding through a 20-minute EMOM workout or practicing handstand holds in a sealed room with zero air circulation. You'll quit before your muscles do.
The Fix: Prioritize air flow:
- Windows: If possible, choose a room with at least one window you can open
- Fans: Install a ceiling fan or use floor fans for air circulation
- Dehumidifier: Essential in humid climates or basement gyms
- Door clearance: Keep your gym door open during workouts if possible
- Portable AC: Consider this for garage gyms in hot climates
For basement or garage gyms without windows, invest in proper ventilation equipment. A simple floor fan can make a massive difference in your training environment and equipment longevity.
Putting It All Together: Your Floor-to-Ceiling Gym Setup Checklist
Before you invest in any floor to ceiling gym equipment, run through this checklist:
✓ Space Assessment:
- Measured ceiling height (accounting for mats)
- Checked floor-to-ceiling clearance with arms extended
- Confirmed room dimensions and clearances
- Identified structural elements (ceiling joists, floor supports)
✓ Installation Considerations:
- Decided on permanent vs. no-damage mounting
- Verified weight capacity of ceiling/floor
- Planned for adjustability and future modifications
- Checked flooring condition and evenness
✓ Equipment Selection:
- Chosen versatile, multi-function equipment over single-purpose
- Verified quality construction and warranty
- Confirmed equipment fits your ceiling height
- Read reviews from serious athletes
✓ Environment Setup:
- Installed appropriate flooring
- Planned ventilation strategy
- Organized storage for accessories
- Left room for progression and additional equipment
The Bottom Line
Setting up a legit home gym with floor-to-ceiling equipment isn't complicated, but it does require planning. Make these seven mistakes, and you'll end up frustrated, broke, or injured. Avoid them, and you'll create a training space that rivals any commercial gym: without the monthly fees, commute time, or equipment hogs hogging the pull-up bar.
Whether you're training for your next ninja warrior competition, grinding through CrossFit WODs, or building elite calisthenics skills, your equipment setup either supports your goals or holds you back. Choose wisely.
Ready to set up your floor-to-ceiling gym the right way? Start by checking out equipment designed by athletes, for athletes, at Bold Body Fitness. No wall damage. Maximum versatility. Built to last.
Now stop reading and start training. Those PRs won't hit themselves.