
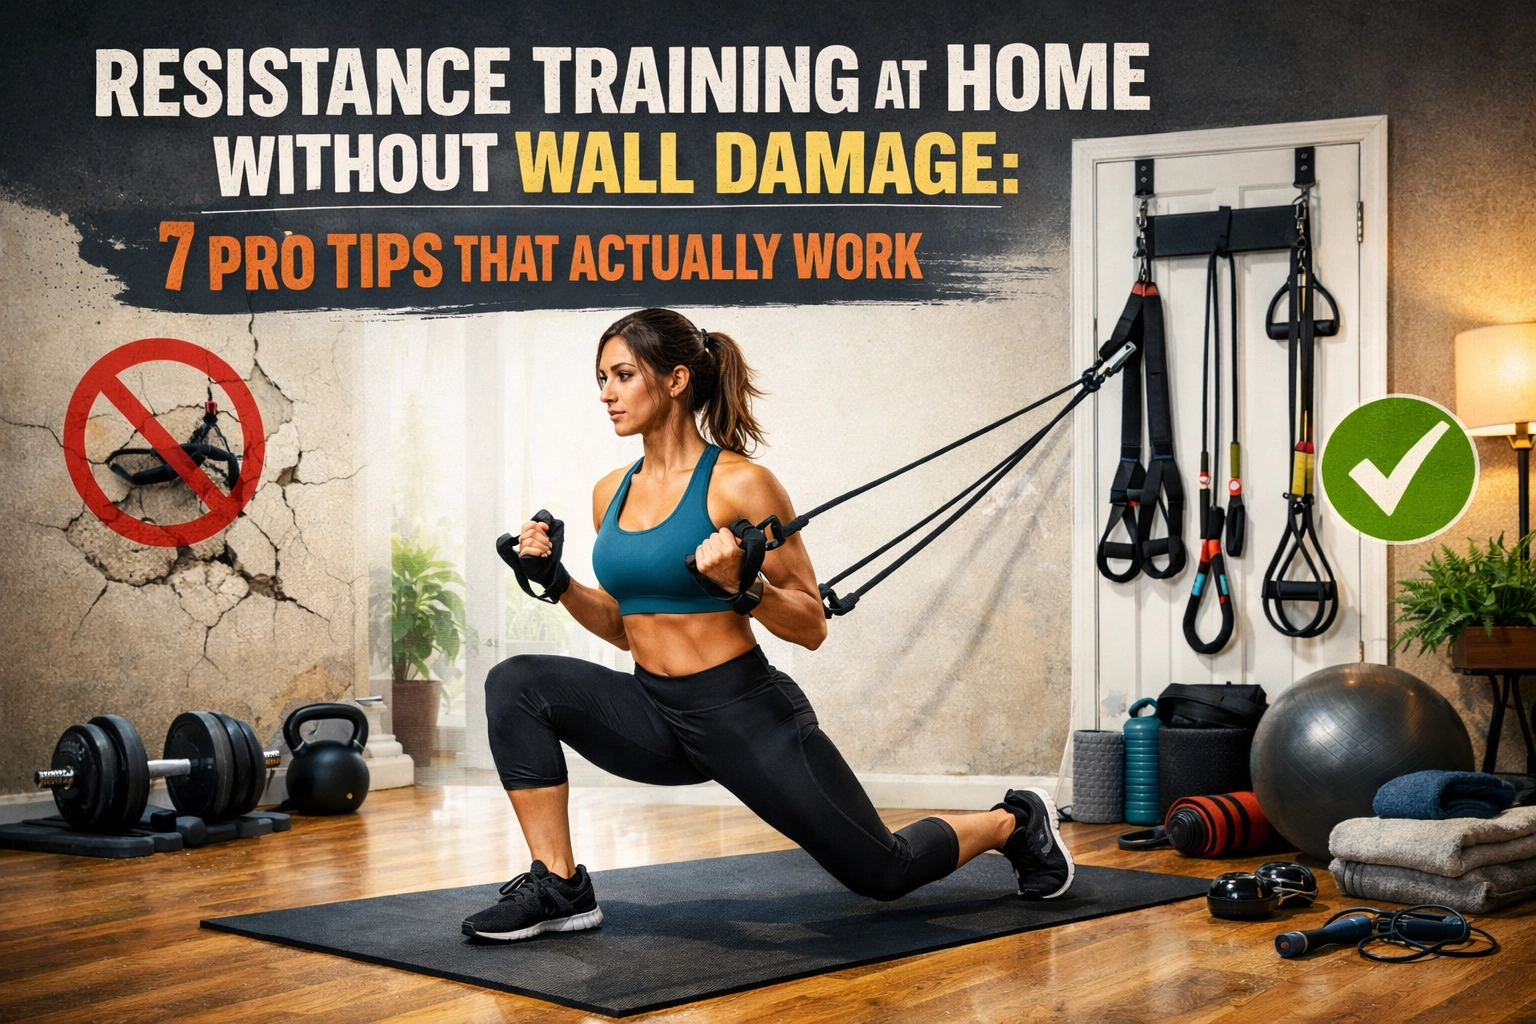
Look, we need to talk about the elephant in the room: or rather, the damaged walls in your home gym. You've invested in building your strength, but your landlord (or your spouse) isn't exactly thrilled about the scuff marks, dents, and holes that come with serious resistance training at home.
Here's the thing: you shouldn't have to choose between beast-mode workouts and keeping your security deposit. Whether you're a CrossFit athlete, ninja warrior, or calisthenics practitioner, damaging your walls during training is not a badge of honor: it's just poor planning.
I've spent years helping athletes create killer home gym setups that deliver results without destroying their living spaces. These seven pro tips will help you train like a champion while keeping your walls pristine.
1. Choose Equipment That Actually Distributes Weight Properly
Most wall damage happens because people use equipment that concentrates force on small contact points. That pull-up bar screwed into your doorframe? It's creating massive pressure on a tiny area. Same goes for resistance bands anchored to door hinges.
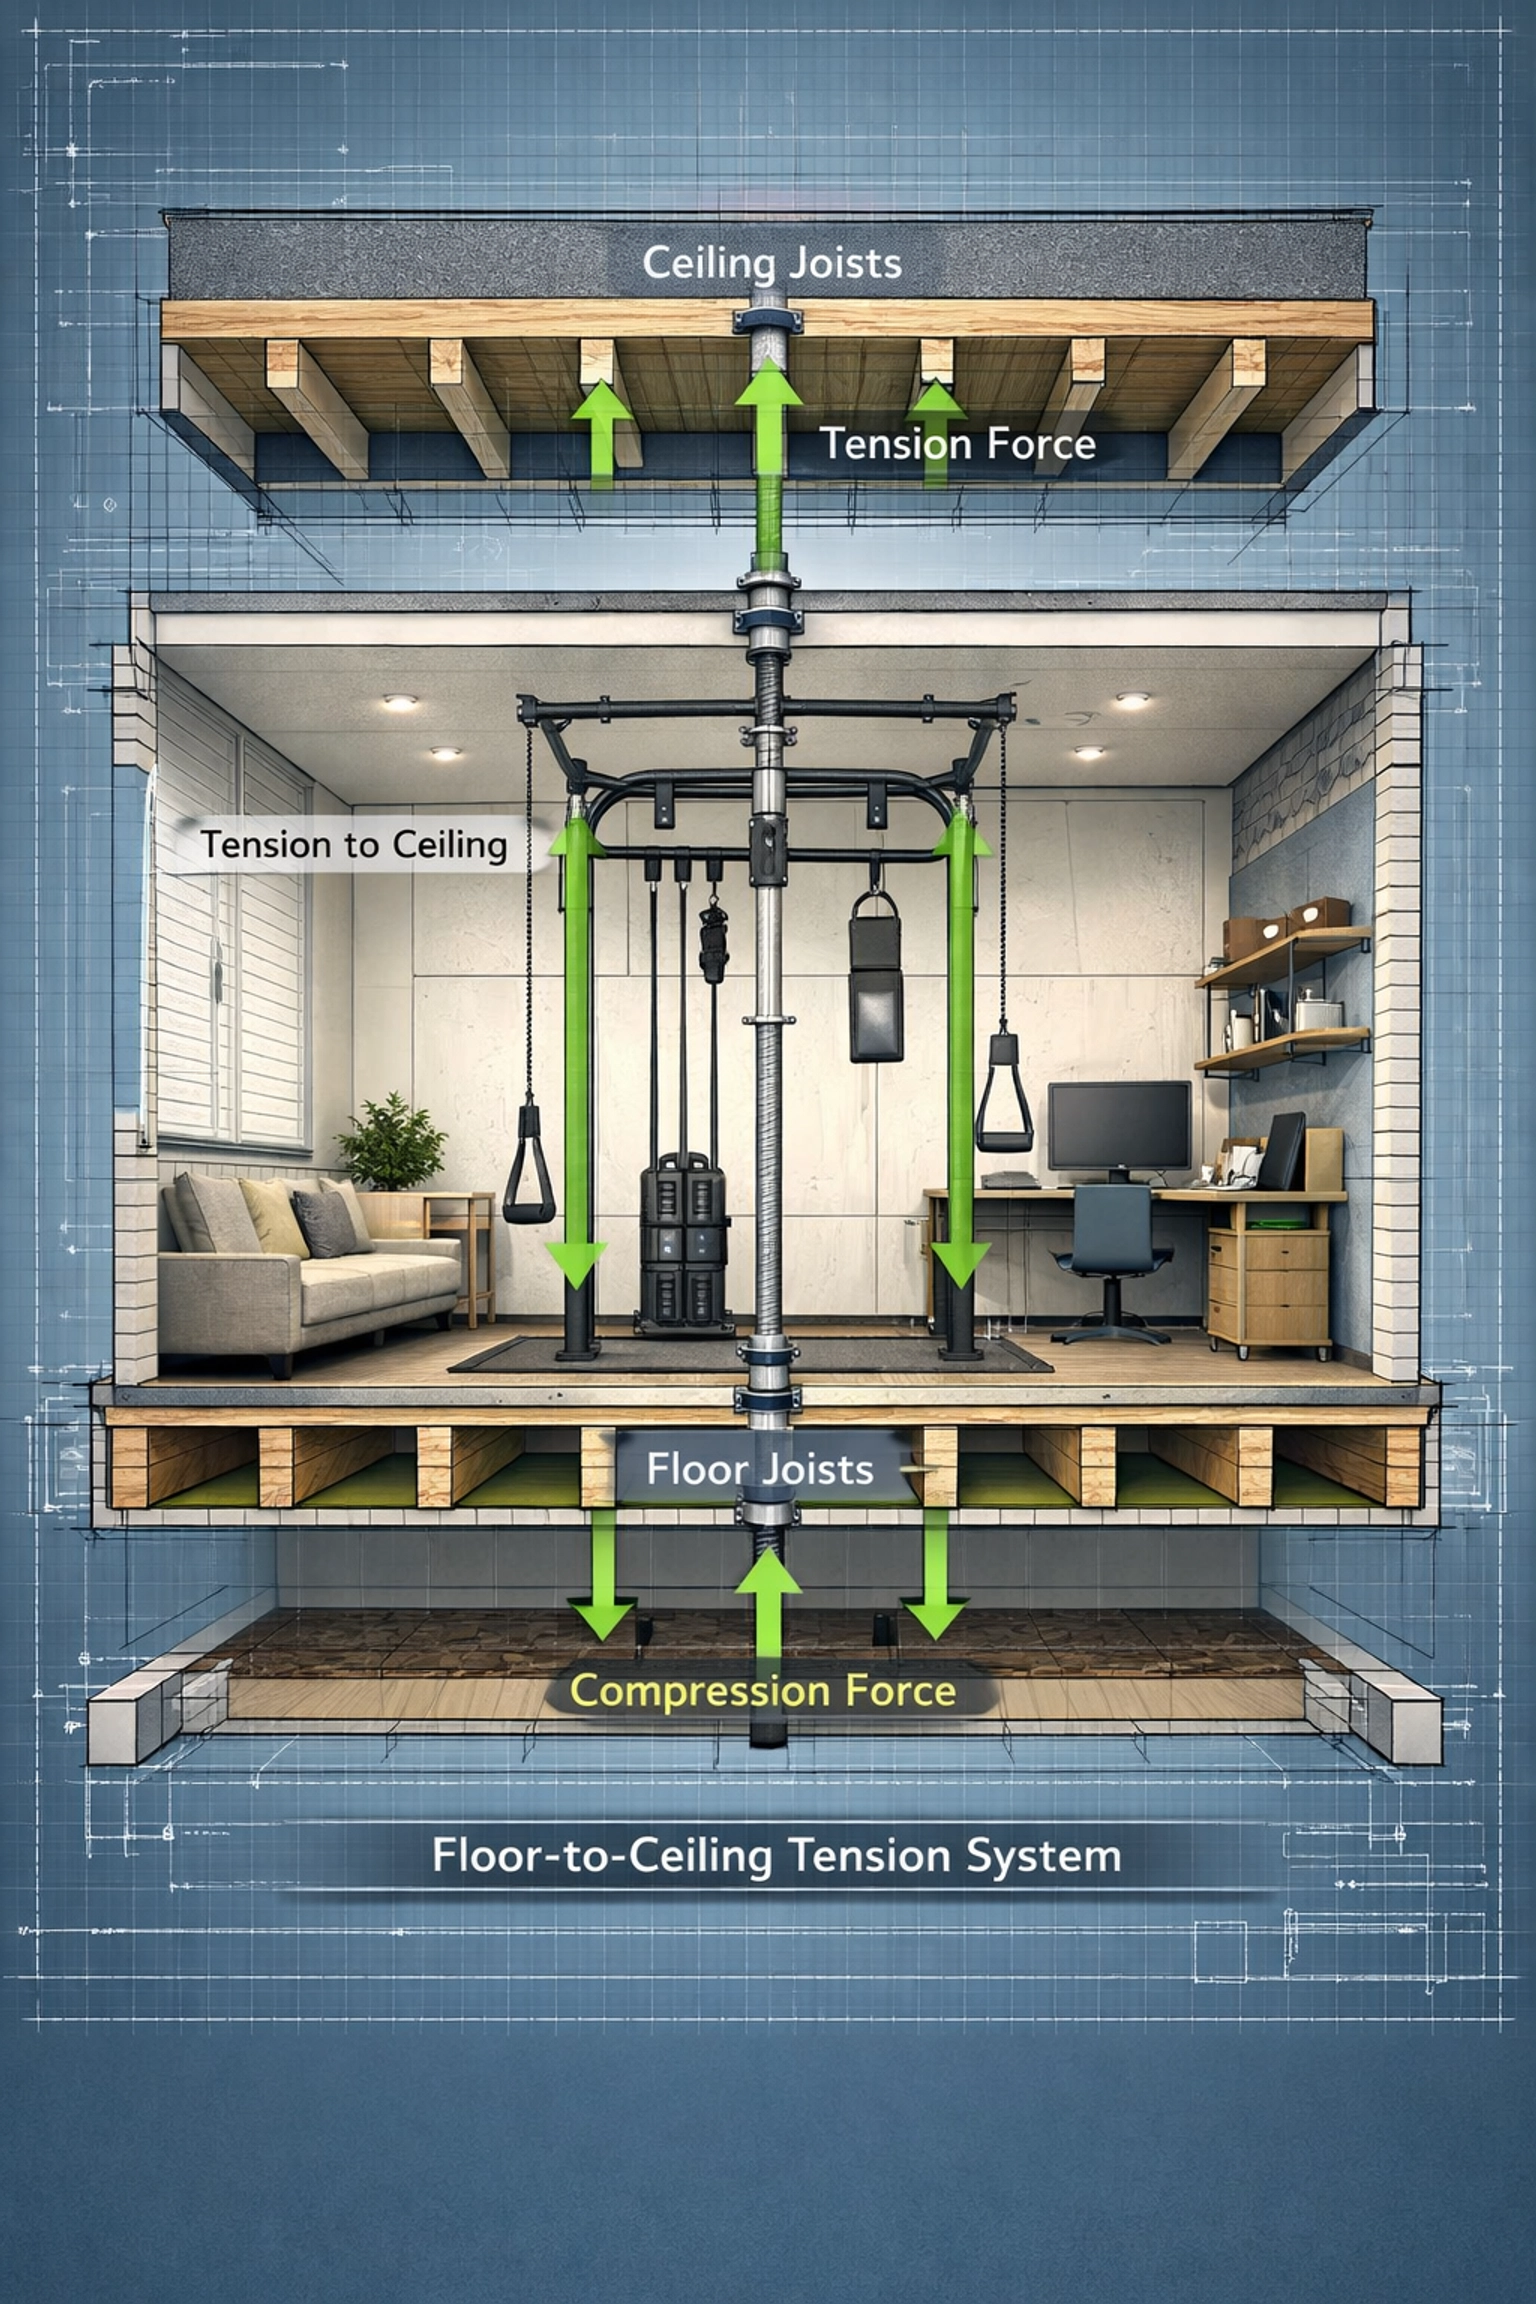
The solution is simple: use equipment designed to distribute weight across a larger surface area. Floor-to-ceiling systems spread load vertically, eliminating the sideways torque that causes wall damage. When you're doing muscle-ups or heavy pull-ups, that distribution matters.
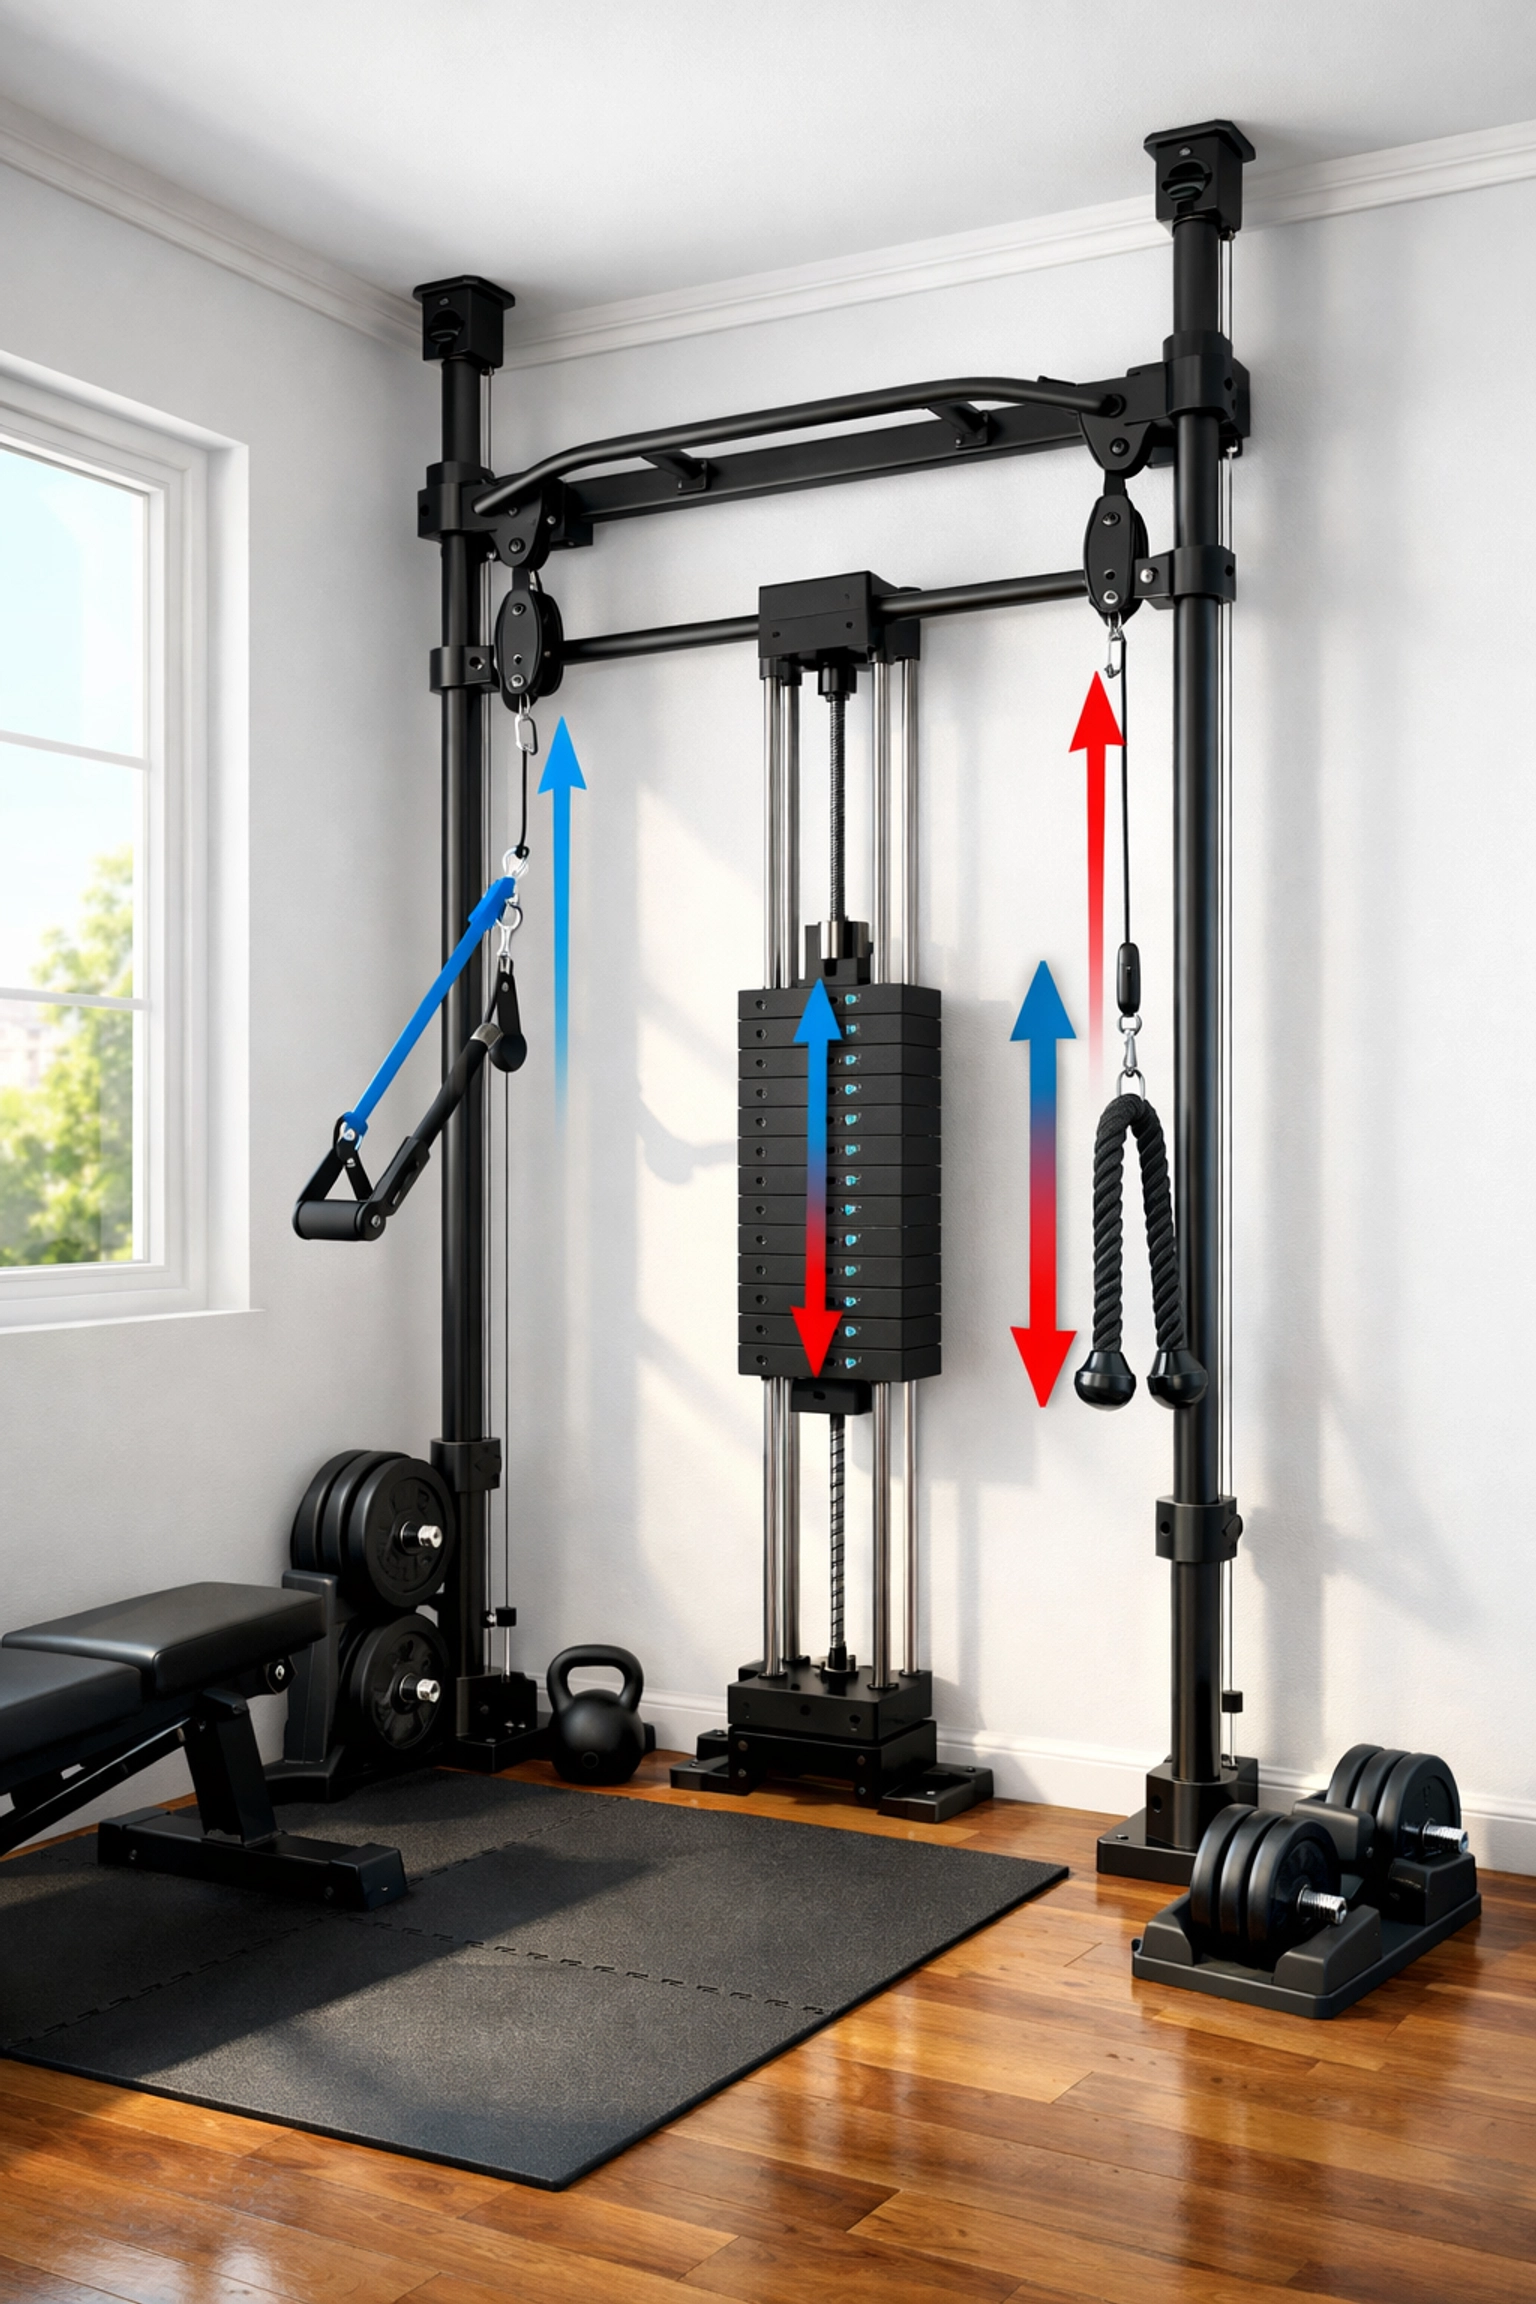
The Resistance Rail from Bold Body Fitness uses this principle perfectly. Instead of drilling into walls or doorframes, it leverages tension between your floor and ceiling: distributing hundreds of pounds of force evenly without leaving a single mark. It's physics working in your favor.
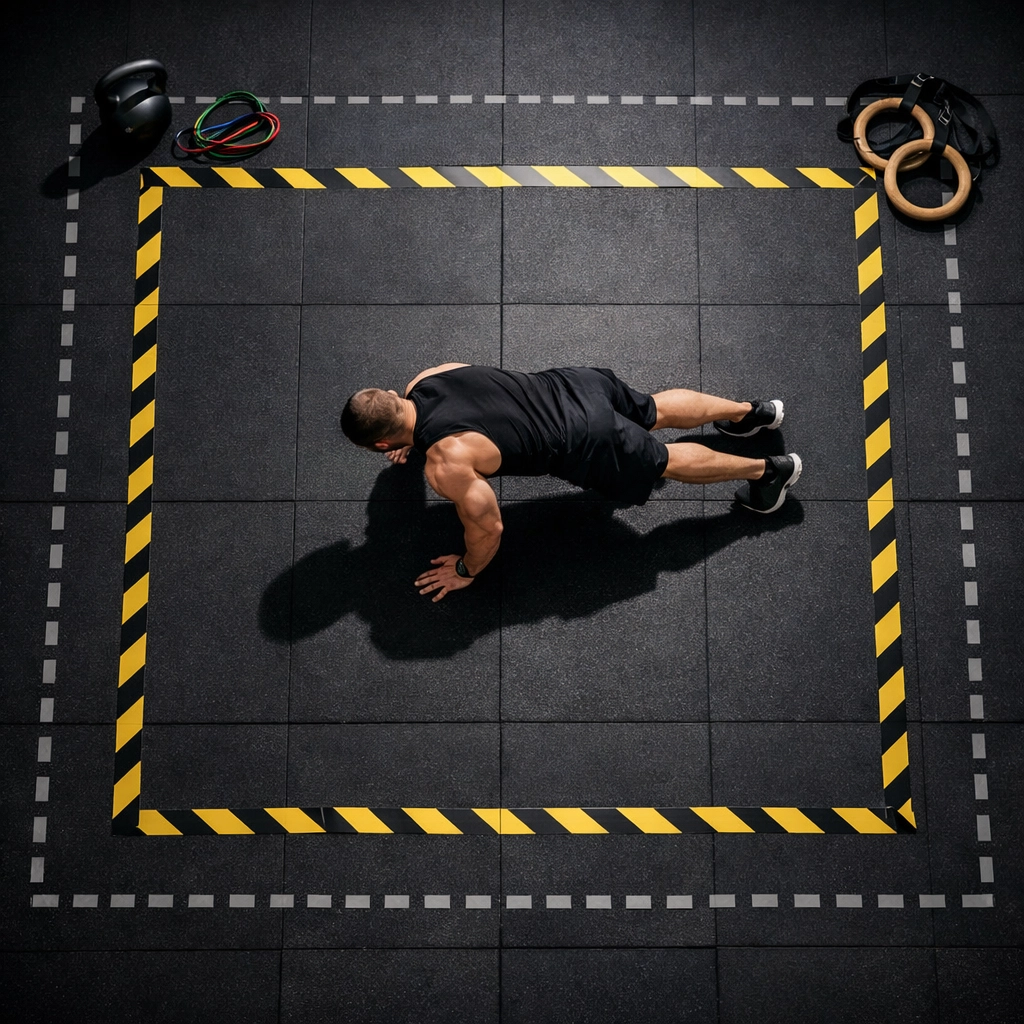
2. Create a Proper Training Zone (And Actually Stick To It)
Here's where most people screw up: they think their entire apartment is their gym. Next thing you know, they're doing box jumps near the entertainment center and kettlebell swings two feet from the drywall.
Designate a specific training zone in your space. Measure it out. Know exactly how much clearance you have in every direction. When you're crushing burpees or doing dynamic movements, you need at least 3-4 feet of clearance from any walls.
Mark your training zone with tape on the floor if you need to. Sounds basic? Maybe. But it works. I've seen too many MMA fighters get carried away during shadowboxing drills and accidentally introduce their fist to the wall. Don't be that person.
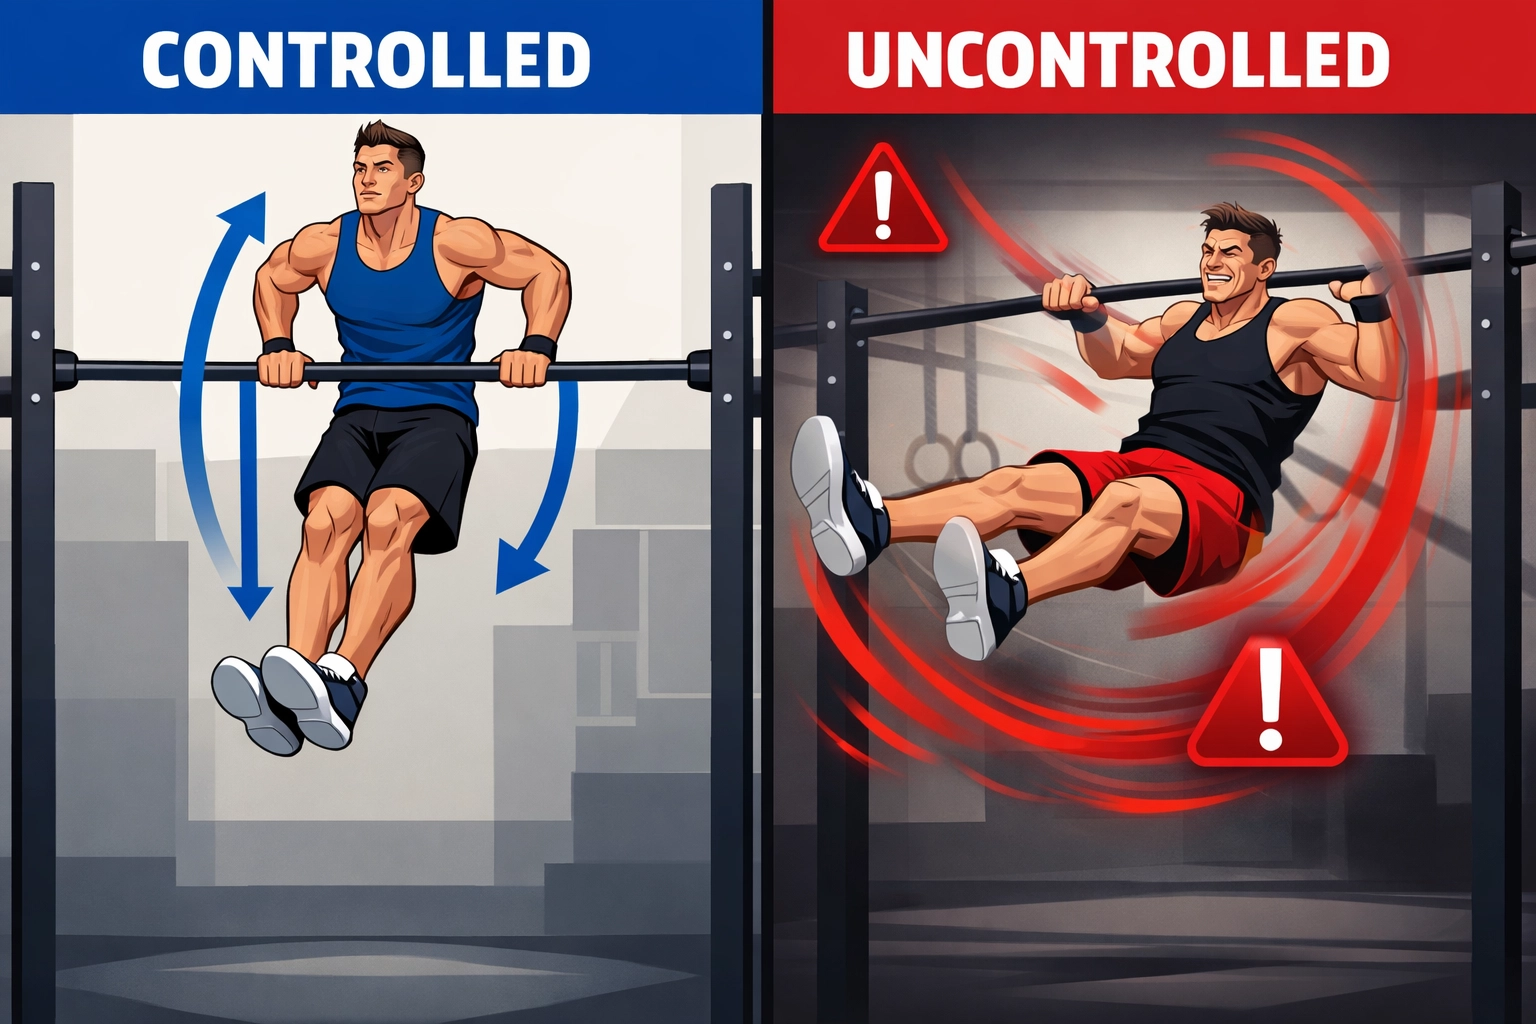
3. Master Controlled Movement Over Chaos
Explosive power is essential, but uncontrolled momentum is what damages walls. The difference between an elite athlete and someone who just trains hard is control through the entire range of motion.
When you're doing kipping pull-ups, muscle-ups, or any dynamic calisthenics movement, every part of the movement should be intentional. Your legs shouldn't be flailing wildly. Your body shouldn't be swinging into the wall during the descent.
This isn't about training softer: it's about training smarter. Controlled explosiveness actually builds more functional strength than wild, uncontrolled movements. Plus, it keeps your walls intact.
4. Invest in Strategic Padding (But Not Where You Think)
Everyone's first instinct is to pad their walls. That's not wrong, but it's incomplete thinking. The real damage often comes from equipment, not your body.
Pad the base of your equipment. Get rubber mats that actually absorb impact. If you're doing any exercises where weights might touch down, you need serious floor protection: and that protection needs to be thick enough to prevent bouncing that could damage walls.
For a complete versatile home gym setup, floor protection should be your second investment after your primary training equipment. We're talking at least 3/4-inch rubber mats, not those flimsy foam puzzle pieces.
5. Rethink Your Pull-Up Bar Strategy Entirely
Traditional pull-up bars are wall damage waiting to happen. Doorframe bars create stress points. Wall-mounted bars require drilling. Both options limit your exercise variety and create stability issues that lead to swinging, which leads to... you guessed it, wall damage.
The pull-up bar alternative that actually makes sense is a floor-to-ceiling system. You get more exercise variety (think gymnastic rings, TRX-style training, resistance bands at multiple heights), better stability, and zero wall damage.
This is where equipment like the Resistance Rail shines. It's not just a pull-up bar: it's a complete training system. Ninja warriors use it for grip training. Gymnasts use it for ring work. CrossFit athletes use it for muscle-ups and rope climbs. All without touching your walls.
6. Use Proper Anchor Points (And Understand Load Dynamics)
If you're using resistance bands or suspension trainers, how you anchor them determines whether your walls survive. Door anchors that go over the top of the door are decent, but they still create friction points that can damage paint and wood over time.
The physics here matter: when you pull at an angle, you're creating multi-directional force. A 200-pound athlete doing banded face-pulls isn't just applying 200 pounds of horizontal force: they're creating significantly more stress through leverage and angle.
Floor-to-ceiling anchor points eliminate this problem entirely. The force travels vertically into structural elements designed to handle it: your floor joists and ceiling joists. This is why serious athletes are moving away from wall-mounted systems toward calisthenics equipment for home that uses vertical tension.
7. Plan Your Space Like a Professional Gym (Because You're Not Casual)
Professional gyms don't just randomly place equipment. There's intention behind every layout decision. Your home gym deserves the same thoughtfulness.
Map out your movement patterns for different exercises. Where does your body travel during a kipping pull-up? How much space do you need for box jumps? What's your landing zone for rope climbs?
Create stations for different training modalities. Your bodyweight training at home station should be separate from your heavy resistance zone. Your explosive movements area needs maximum clearance. Your skill work area (handstands, L-sits) can be more compact.
When you're building a CrossFit home gym or setting up for serious training, this planning phase is where you prevent 90% of potential wall damage. Take measurements. Be honest about your space. Make smart compromises.
The Bottom Line: Train Hard, Damage Nothing
Here's what it comes down to: you don't need to sacrifice your walls to build an impressive physique. You need proper equipment, smart planning, and a commitment to controlled movement.
The athletes getting the best results at home aren't the ones swinging wildly and hoping for the best. They're the ones who've created intelligent training environments that support progressive overload without collateral damage.
Whether you're setting up your first home gym or upgrading from a setup that's already caused some "character marks" on your walls, these principles work. The Bold Body Fitness approach has always been about maximizing training potential while minimizing compromise: and that includes compromising your living space.
Your walls don't need to be casualties of your fitness journey. Train smart, train hard, and leave your security deposit intact. Your future self (and your landlord) will thank you.