
Most home gyms are built horizontally. Racks sprawl across floors, dumbbells eat up square footage, and machines dominate entire rooms. But here's what serious athletes know: the strongest home gym setups aren't just built out: they're built up.
A true floor-to-ceiling gym maximizes every cubic inch of your training space. It transforms cramped basements and spare bedrooms into functional training centers that rival commercial facilities. Whether you're a CrossFit athlete chasing your next PR, a ninja warrior building grip endurance, or an MMA fighter conditioning for fight camp, understanding vertical training space changes everything.
This isn't a guide for casual fitness. This is for athletes who train like their performance depends on it: because it does.
Why Floor-to-Ceiling Training Space Matters
Traditional home gym equipment ignores 40-60% of your available space: the vertical zone between your head and ceiling. That's wasted real estate where pull-ups, rope climbs, muscle-ups, hanging leg raises, and dozens of calisthenics movements happen.
Floor-to-ceiling systems create training environments that support:
- Gymnastics progressions requiring overhead clearance
- Vertical pulling movements that build back thickness and grip strength
- Dynamic movements like kipping pull-ups and bar muscle-ups
- Suspension training at multiple anchor points
- Combat sports conditioning with climbing ropes and pegboards
The difference between a mediocre home gym and a performance-focused training space often comes down to vertical utilization.
Space Assessment: Measuring Your Training Zone
Before buying a single piece of equipment, get accurate measurements. Grab a tape measure and record these critical dimensions:
Floor Space:
- Total square footage (length × width)
- Usable training area (minus doorways, HVAC vents, utilities)
- Clearance around where equipment will sit (minimum 2-3 feet)
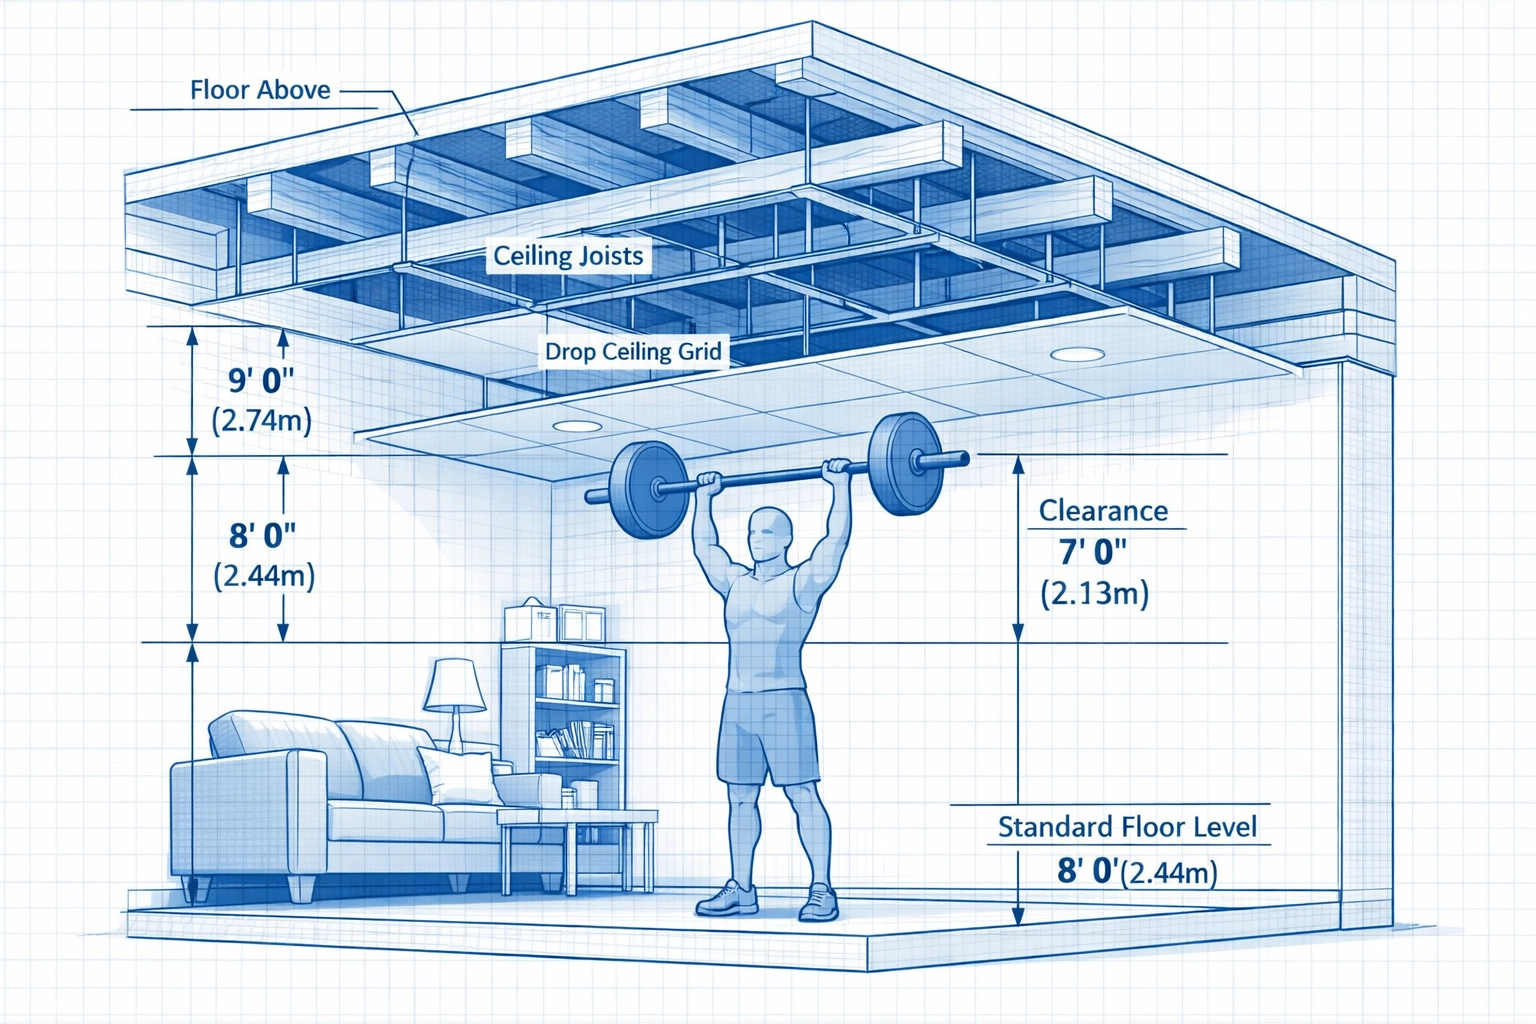
Ceiling Height:
- Standard ceiling measurement
- Height of any drop ceilings (check if removable: you might gain 18-24 inches)
- Location of ceiling joists (critical for mounting anchors)
- Any obstructions (lights, pipes, ductwork)
Here's the reality check: you need at least 8 feet of ceiling height for effective overhead work. For serious vertical training, 9-10 feet is ideal. If you're working with 7 feet or less, your options narrow significantly.
Minimum space recommendations:
- Basic strength setup (rack, bench, barbell): 75-100 sq ft
- Hybrid setup (rack, functional trainer, accessories): 120-150 sq ft
- Full performance gym (multiple zones, cardio, storage): 180-250 sq ft
A standard 10×10 room (100 sq ft) works surprisingly well for focused strength and calisthenics training: if you build vertically.
Ceiling Height: The Non-Negotiable Factor
Your ceiling height determines which exercises are possible. Period.
Minimum clearances for common movements:
- Standing overhead press: Your height + 12-18 inches
- Pull-ups and muscle-ups: Your height + 24-30 inches
- Rope climbs: 12-15 feet minimum
- Ring work: 10-12 feet for proper clearance
Most residential ceilings measure 8-9 feet. That's barely adequate for a 6-foot athlete doing strict pull-ups and completely inadequate for dynamic kipping movements.
The practical formula: Add one foot to your tallest user's height. That's your minimum ceiling requirement for basic overhead work.
If you're stuck with low ceilings, you have three options:
- Remove drop ceilings to access the actual ceiling structure above
- Install shorter equipment like angled pull-up bars or compact Smith machines
- Focus training on horizontal movements (not ideal, but workable)
Or option four: Install a floor-to-ceiling system designed for standard residential heights. More on that in a moment.
Foundation First: Flooring That Handles Real Training
Your floor takes a beating. Dropped barbells, slamming medicine balls, jump rope sessions, burpees, box jumps: all of this destroys standard residential flooring.
Start with surface prep:
- Fill major cracks in concrete
- Buff or grind uneven spots
- Clean thoroughly (rubber flooring doesn't adhere to dusty surfaces)
- Check for moisture issues (critical in basements)
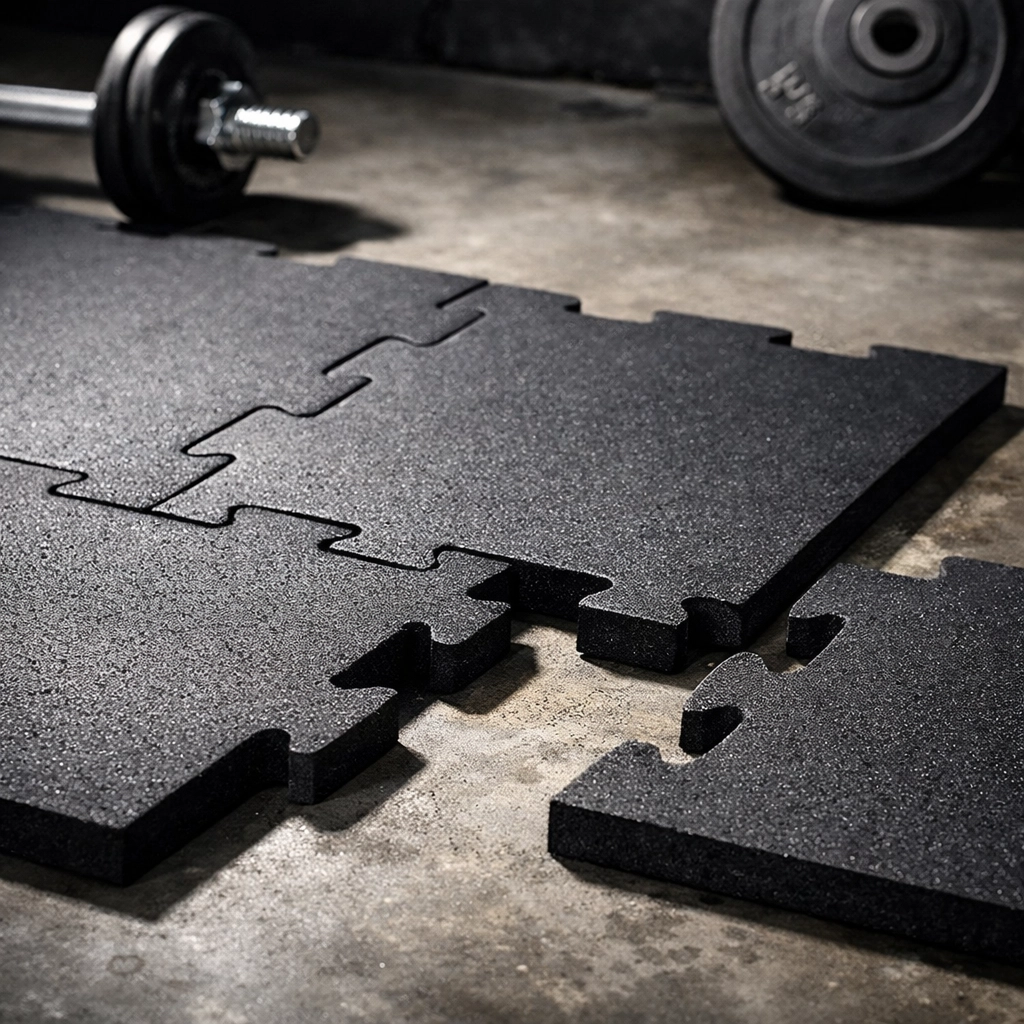
Primary flooring option: ⅜-inch rubber interlocking tiles
These are the gold standard for home gym flooring. They install in hours, create seamless surfaces, provide excellent grip, and cushion without being spongy. No adhesive required: they lock together and stay put under heavy equipment.
Alternative options:
- Horse stall mats: 4×6 foot rubber mats from Tractor Supply Co (cheap, durable, but heavy and difficult to cut)
- Professional rubber rolls: Custom-fit options from companies like Rogue or Kodiak (expensive but clean)
- Dual-layer systems: Extra rubber under Olympic lifting platforms for dropped loaded barbells
For most athletes training at home, the interlocking tile system hits the sweet spot of performance, cost, and installation simplicity.
Pro tip: Lay flooring before installing any permanent equipment. It's infinitely harder to fit tiles around a bolted-down rack.
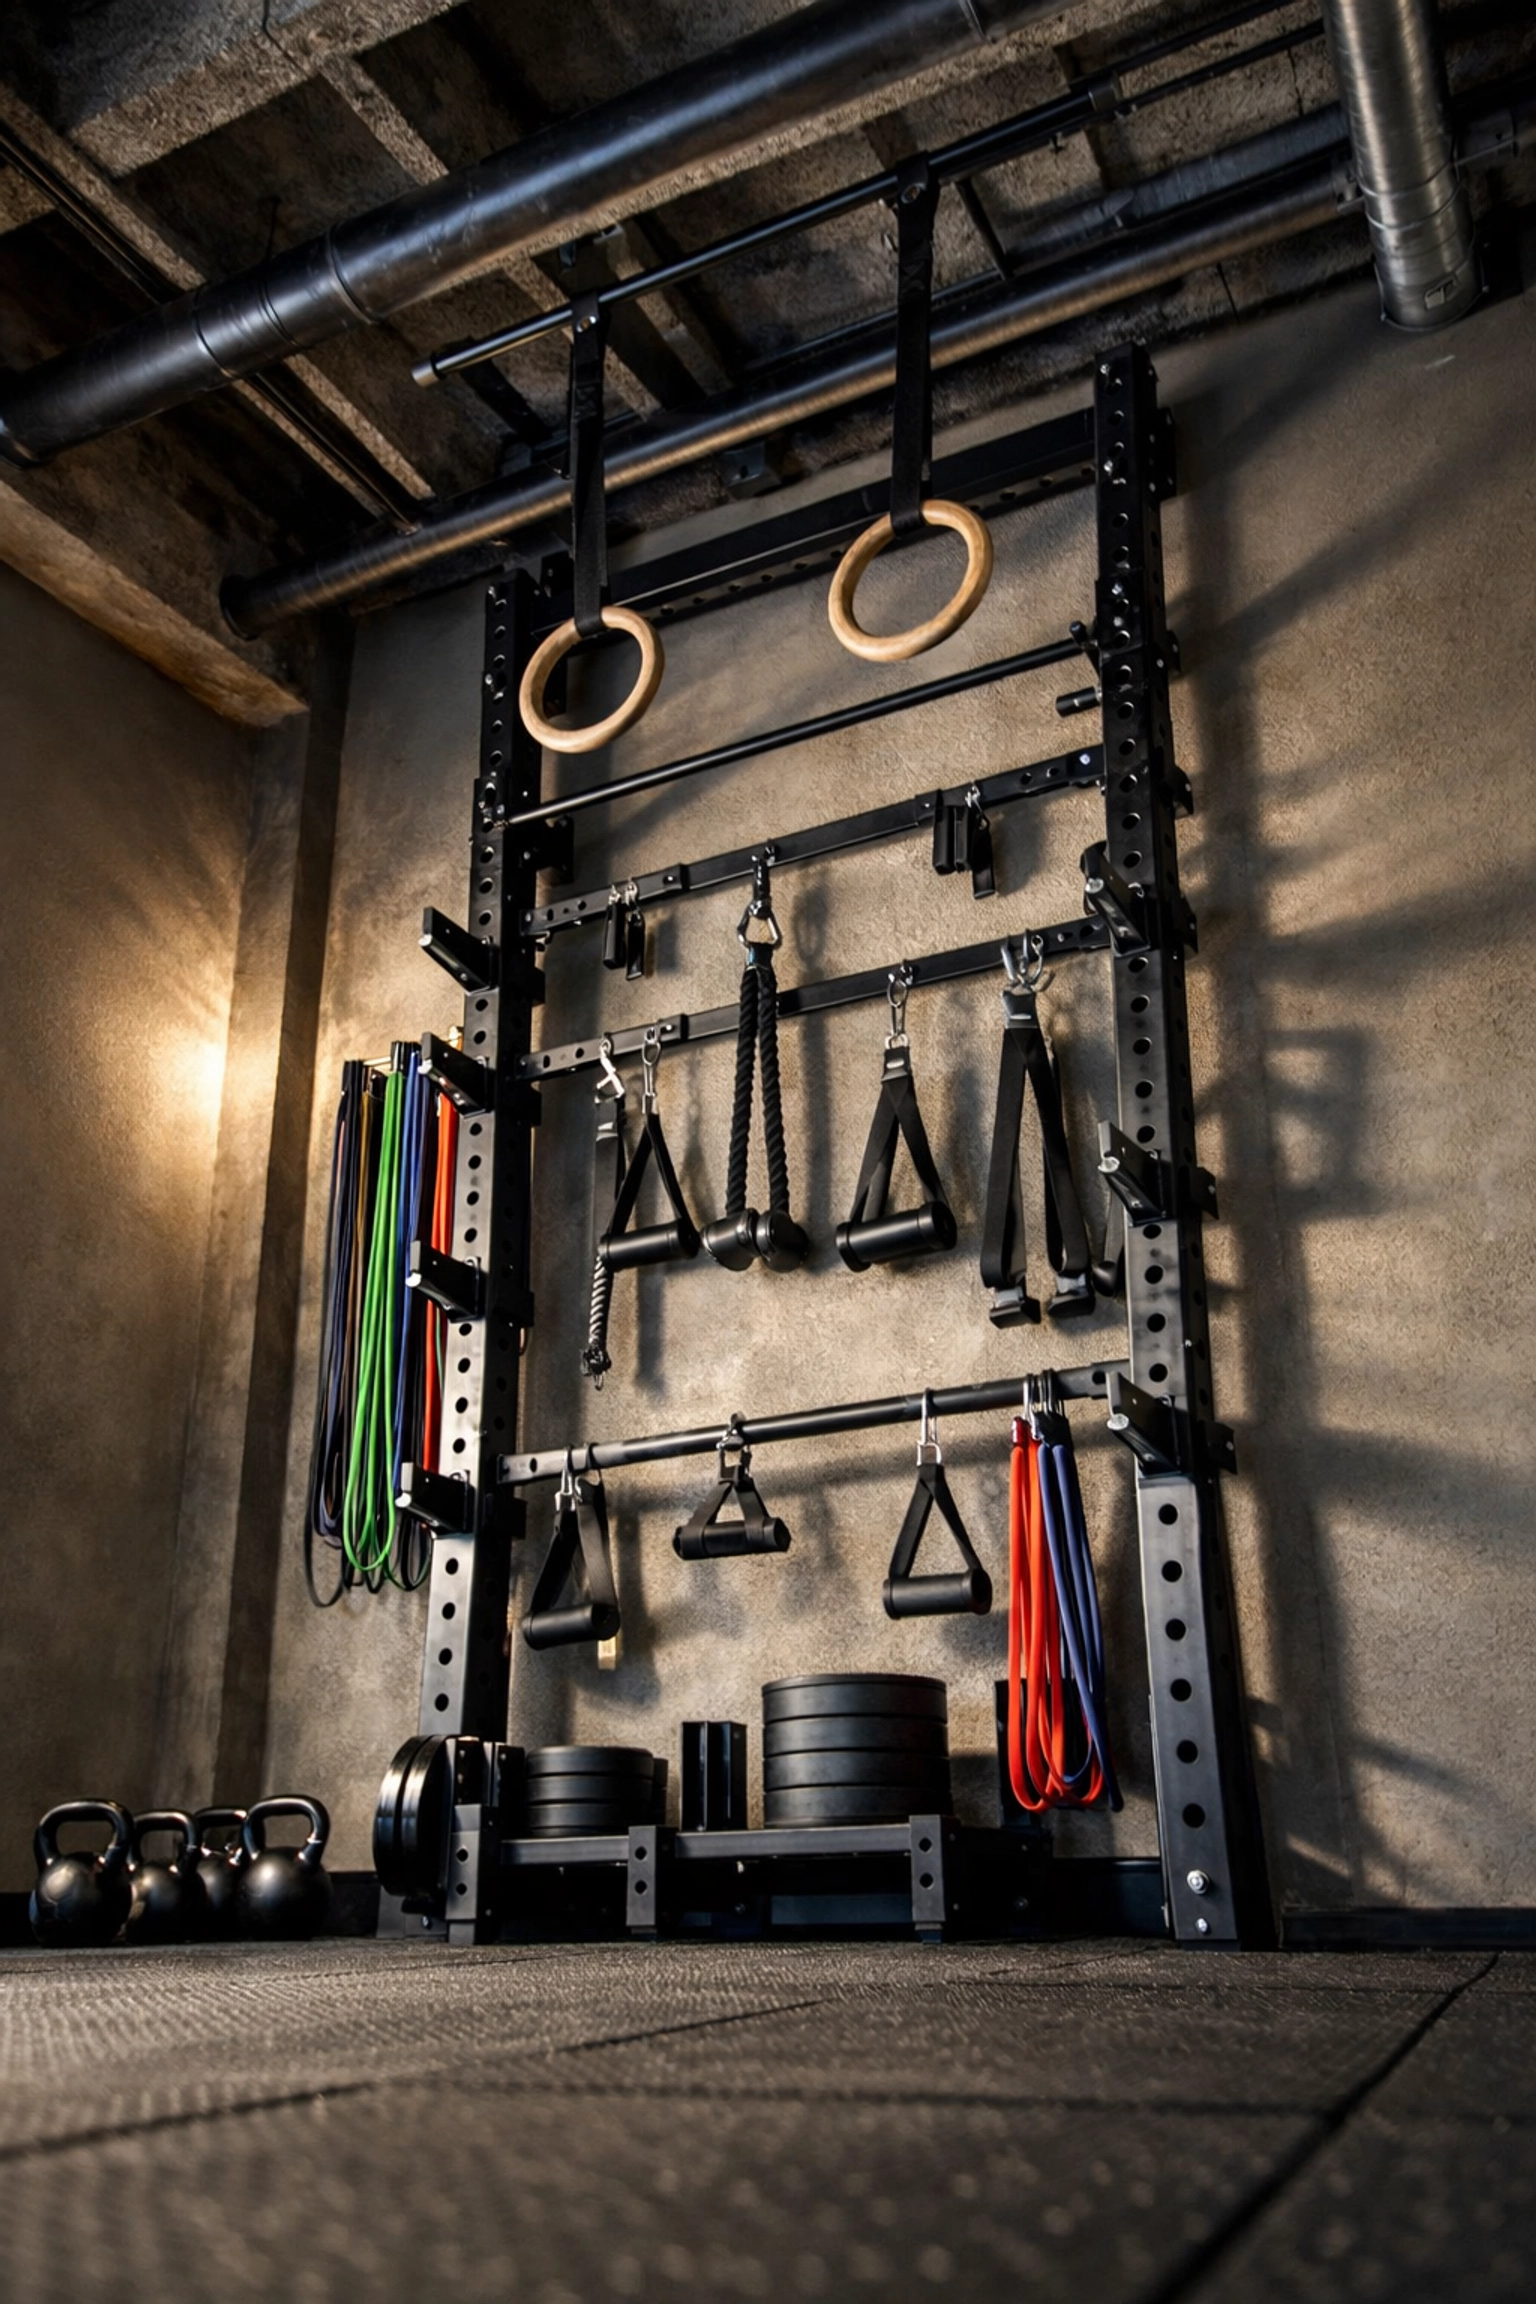
The Floor-to-Ceiling Advantage: Resistance Rail Systems
Here's where traditional home gym logic falls apart: You don't need 400 square feet and a dozen separate pieces of equipment to train at an elite level.
You need intelligent equipment that maximizes vertical space.
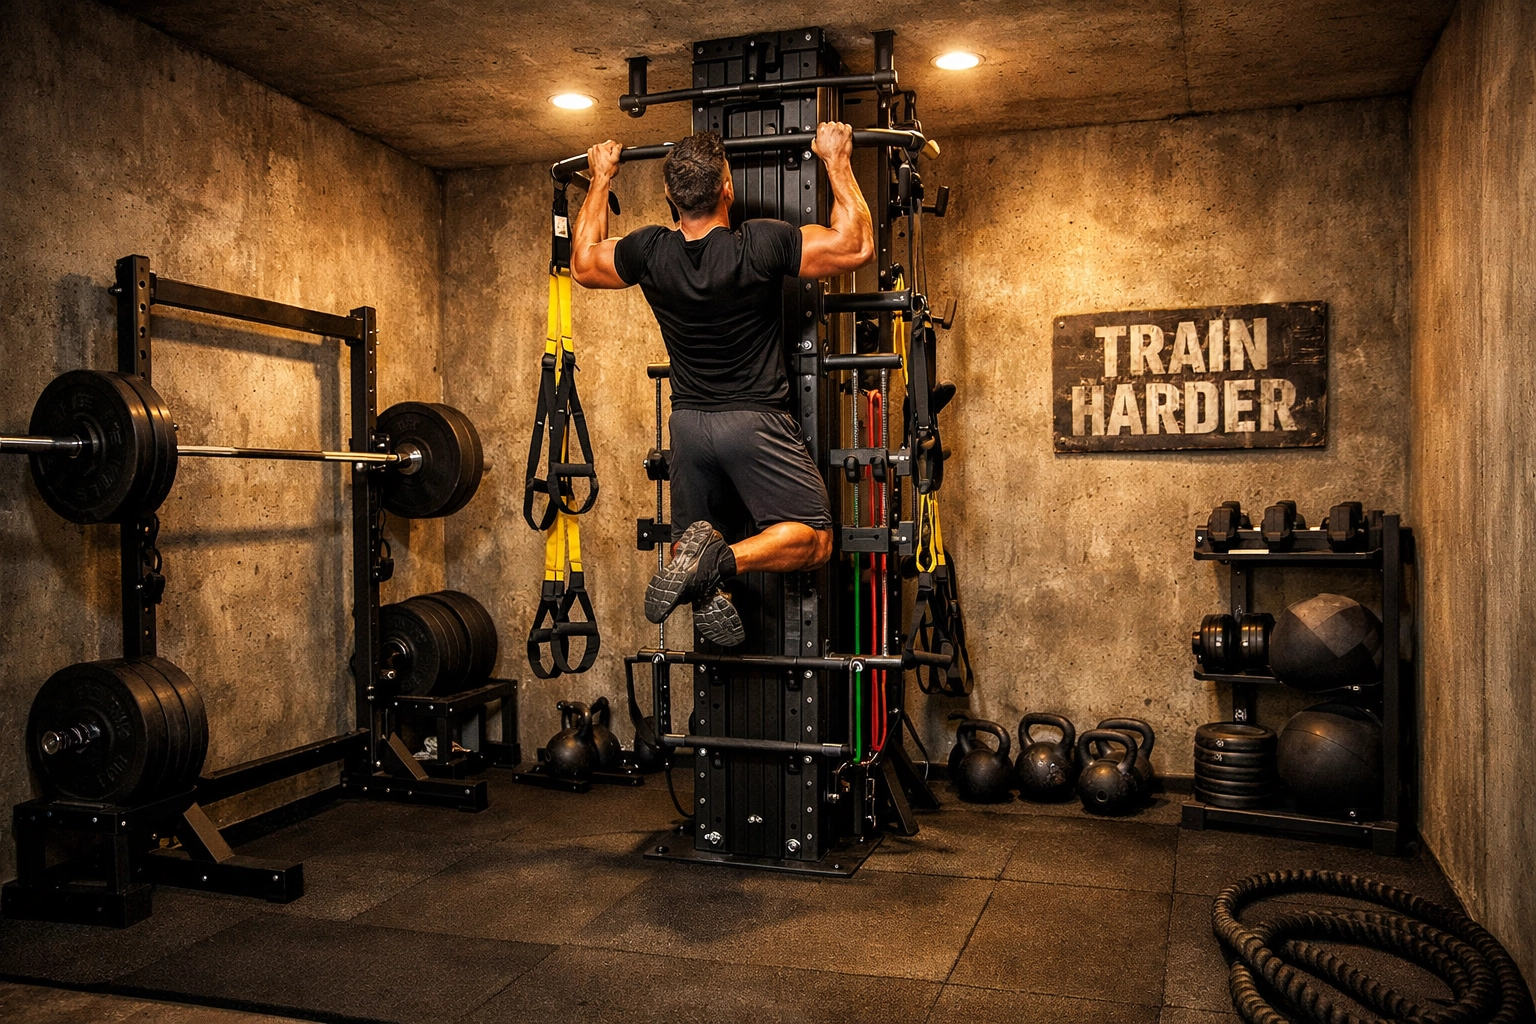
This is where floor-to-ceiling resistance systems like the Resistance Rail from Bold Body Fitness revolutionize home training. Instead of wall-mounted pull-up bars that damage drywall or freestanding racks that consume floor space, these systems create tension from floor to ceiling, literally.
Why floor-to-ceiling systems work:
Zero Wall Damage
The system pressure-mounts between your floor and ceiling joists. No drilling into studs, no permanent holes, no landlord nightmares. Install in minutes, remove just as fast.
Full-Body Training Anchor
One vertical column becomes an attachment point for:
- Pull-up bars (multiple grip positions)
- Suspension trainers (TRX, rings, straps)
- Resistance bands (variable anchor heights)
- Climbing ropes and pegboards
- Battle rope anchors
Space Efficiency
A floor-to-ceiling system occupies roughly 2×2 feet of floor space while providing the functionality of multiple pieces of equipment. For apartment gyms, garage setups, or basements where every square foot matters, this efficiency is unmatched.
Scalable Resistance
Combine bodyweight movements with band resistance for progressive overload. A gymnast doing weighted pull-ups, a CrossFit athlete working muscle-up progressions, or a ninja warrior building grip endurance: all using the same vertical anchor point.
Athletes transitioning from commercial gyms to home training often struggle with limited equipment variety. Floor-to-ceiling systems solve that problem by creating versatile anchor points that adapt to hundreds of exercises.
The Resistance Rail system exemplifies this approach: maximum training options, minimum footprint, zero installation headaches.
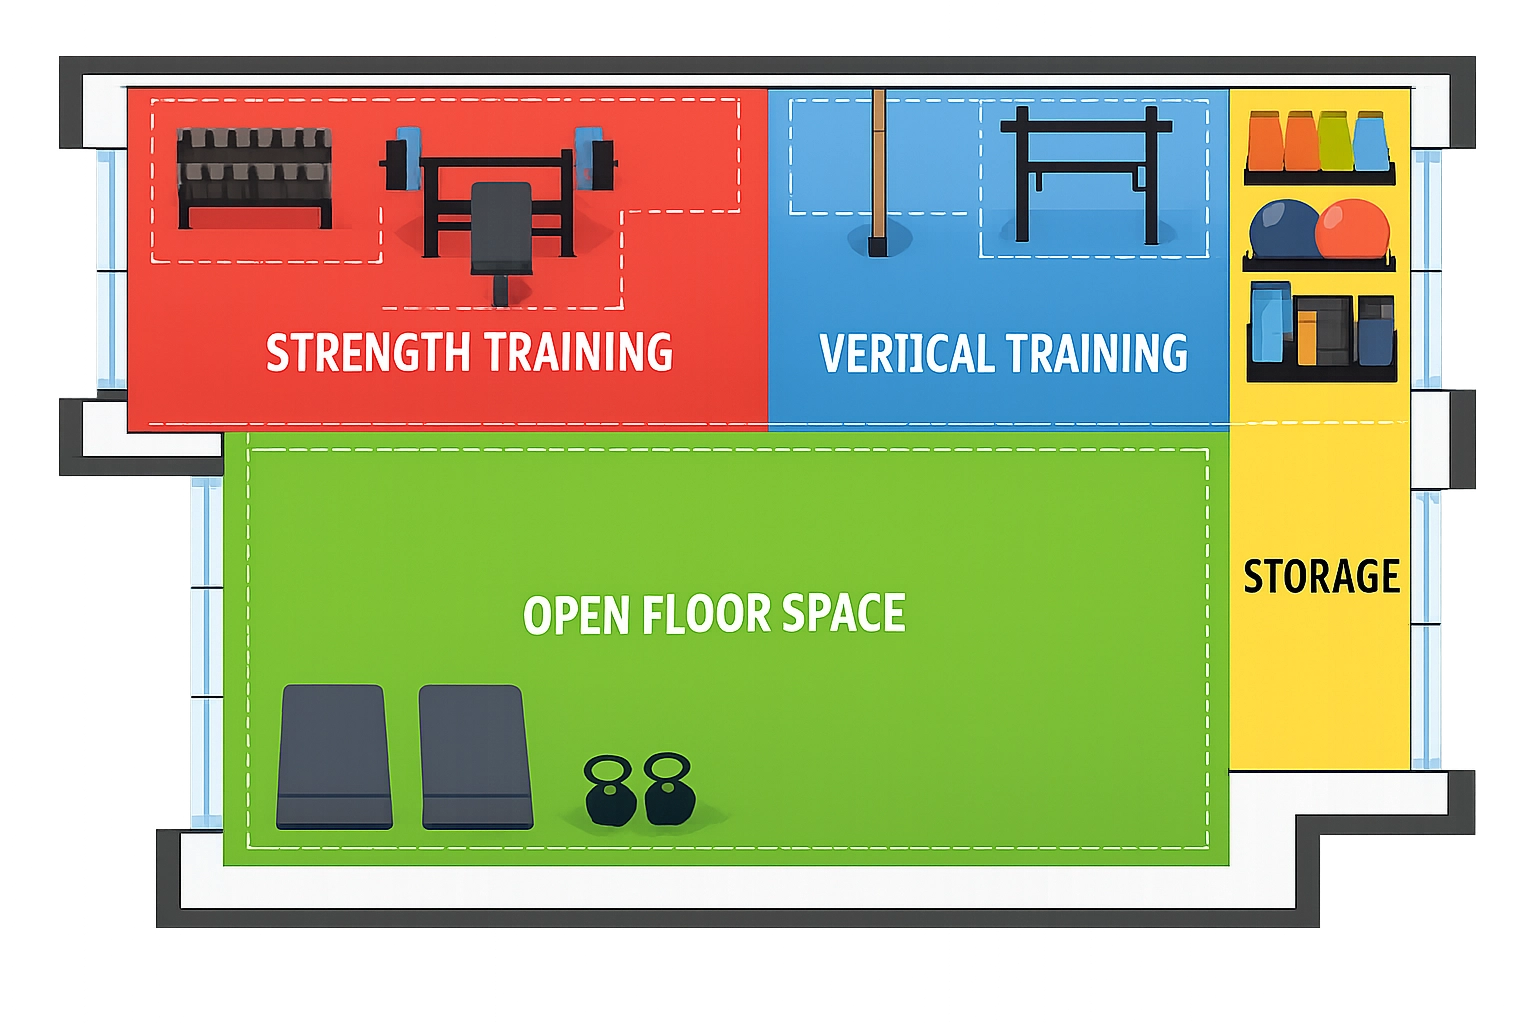
Strategic Layout and Zoning
Even in limited space, proper zoning prevents chaotic training sessions and equipment Tetris.
Zone 1: Strength Area
- Power rack or squat stands
- Olympic barbell and plates
- Adjustable bench
- Vertical plate storage (wall-mounted or compact tree)
Place this zone against your sturdiest wall. Concrete walls in basements or reinforced garage walls work best.
Zone 2: Vertical Training Column
- Floor-to-ceiling system (pull-up station, attachment hub)
- 6-8 feet of clearance in all directions
- Located away from windows or obstacles
This becomes your calisthenics center. Pull-ups, muscle-ups, leg raises, rope climbs: everything happens here.
Zone 3: Open Floor Space
- Minimum 6×8 feet of clear floor
- Used for bodyweight circuits, agility drills, stretching
- Mobile equipment only (kettlebells, dumbbells, slam balls)
Zone 4: Cardio/Conditioning (Optional)
- Assault bike, rowing machine, or jump rope area
- Requires dedicated power outlet
- Position near windows/ventilation
Zone 5: Storage and Recovery
- Vertical storage for bands, straps, accessories
- Foam roller and mobility tools
- Water station
Critical spacing rule: Leave 2-3 feet around all primary equipment. You need movement space for exercises and safety clearance for failed lifts.
For compact setups under 150 sq ft, combine zones. Your open floor space doubles as cardio area. Your strength zone includes vertical storage. Overlap is fine: just ensure each zone serves its primary function without interference.
Equipment Selection Strategy for Elite Performance
More equipment doesn't equal better training. Elite home gyms prioritize versatility over variety.
Tier 1: Essential Foundation
- Quality barbell and plates (Olympic standard)
- Adjustable dumbbells (5-50 lbs minimum)
- Floor-to-ceiling vertical training system
- Resistance bands (light to heavy)
- Quality flooring
This setup covers 80% of strength, hypertrophy, and calisthenics training.
Tier 2: Performance Additions
- Gymnastic rings or TRX system
- Plyo box or stacked mats
- Assault bike or rower
- Climbing rope or pegboard
- Landmine attachment
These expand conditioning, dynamic movement, and sport-specific training.
Tier 3: Specialization Equipment
- GHD or back extension
- Specialty bars (trap bar, safety squat bar)
- Sleds or prowlers (if you have outdoor space)
- Additional cable attachments
- Sport-specific tools (heavy bag for MMA, parallettes for gymnastics)
The multi-function principle: Every piece of equipment should enable at least 10 different exercises. A floor-to-ceiling system supporting pull-ups, muscle-ups, band work, suspension training, rope climbs, and hanging core work? That's 50+ exercise variations from one anchor point.
Single-purpose machines that only do leg extensions or bicep curls? Hard pass for performance-focused training.
Electrical Infrastructure and Power Requirements
Don't overlook the electrical planning: especially if you're adding cardio equipment.
Power outlet requirements:
- Treadmills need dedicated 15-20 amp circuits
- Rowing machines and bikes typically plug into standard outlets
- Never daisy-chain extension cords for motorized equipment
- Position outlets near equipment locations (not across the room)
If you're finishing a basement or garage gym, have an electrician install outlets at equipment locations before flooring goes down. Retrofit wiring is expensive and messy.
Lighting matters too:
- Minimum 50-75 foot-candles of light for safe training
- LED shop lights or track lighting work well
- Add task lighting near mirror/technique check areas
- Natural light from windows reduces eye strain
Quality lighting prevents form breakdown and reduces injury risk during high-intensity training.
Advanced Considerations for Serious Athletes
Climate Control
Garages and basements often lack proper HVAC. Training in 95°F heat or 40°F cold destroys performance and motivation.
- Insulate exterior walls
- Add portable AC or heating units
- Install ceiling fans for air circulation
- Consider a dehumidifier for basement setups
Mirrors and Feedback
Wall mirrors aren't vanity: they're form-check tools.
- Install 4-6 foot mirrors on strength zone walls
- Position at heights that let you check squat depth and pressing positions
- Avoid mirrors directly behind pull-up areas (distracting during dynamic movements)
Sound Management
Dropped barbells, box jumps, and rope slams create noise.
- Add extra rubber flooring layers in high-impact zones
- Use bumper plates instead of iron for Olympic lifts
- Install acoustic foam if you share walls with neighbors
- Train during reasonable hours (seriously, your neighbors will thank you)
Maintenance Access
Leave space to access your circuit breaker, water heater, furnace, or other utilities. Building equipment around critical infrastructure creates problems during emergencies or routine maintenance.
Final Assembly: Bringing Your Vision Together
You've measured the space, selected flooring, chosen equipment, and planned your layout. Now it's time to build.
Installation sequence:
- Install flooring first (full coverage before equipment)
- Mount floor-to-ceiling vertical systems (structural anchors require ceiling joists)
- Position heavy equipment (racks, benches, cardio machines)
- Install mirrors and lighting
- Add accessories and storage
- Test clearances with actual movements
Safety check before first workout:
- Test all ceiling-mounted equipment with bodyweight hangs
- Verify clearances during full range-of-motion exercises
- Ensure flooring doesn't shift under jumping/landing
- Check that all equipment sits level and stable
- Identify any sharp edges or pinch points
The first workout protocol:
Start with light movements and progress slowly. Test equipment under load before attempting max efforts. Adjust spacing as needed based on actual training flow.
Build Your Performance Space
A bulletproof floor-to-ceiling gym setup isn't about buying the most equipment or having the largest space. It's about maximizing every dimension: length, width, and height: to create a training environment that supports serious athletic development.
Whether you're installing a Resistance Rail system for versatile vertical training, building a strength zone around a power rack, or designing a hybrid setup that handles everything from Olympic lifts to ninja warrior progressions, the principles remain consistent:
Plan deliberately. Build vertically. Train intensely.
Your home gym should be the place where PRs happen, weaknesses get eliminated, and performance advances. Not a storage unit for equipment you dodge while doing half-reps.
Ready to stop training around your space and start maximizing it? Check out the complete range of floor-to-ceiling training solutions at Bold Body Fitness and build the home gym your training deserves.