
You're done with crowded gyms, waiting for equipment, and paying monthly fees that add up to thousands per year. Building a floor-to-ceiling home gym isn't just about convenience: it's about creating a training environment that's designed for your goals, your schedule, and your standards.
Whether you're a CrossFit athlete prepping for competitions, an MMA fighter working ground-to-stand transitions, or a calisthenics practitioner chasing that muscle-up PR, a properly designed home training station gives you the freedom to train hard without compromise.
Here's the truth: most people overthink home gym setups and end up with cluttered spaces filled with equipment they don't use. This guide cuts through the noise and gives you a proven 5-step system to build a functional, pro-level training station: even if you're starting from scratch.
Let's get to work.
Step 1: Measure Your Space Like Your Training Depends On It (Because It Does)
Before you spend a single dollar on equipment, grab a tape measure and get obsessive about your space. This isn't optional: your ceiling height, floor dimensions, and clearance zones determine everything from what equipment you can use to how safely you can train.
Start with the essentials:
-
Ceiling height: Measure from floor to ceiling at multiple points. Most homes have 8-foot ceilings, which is workable but tight. If you're doing overhead pressing, pull-ups, or rope climbs, add at least 12 inches above your reach height. A 6-foot athlete needs a minimum 7-foot ceiling for comfortable pull-ups: 8 feet is ideal.
-
Floor space: The sweet spot for a functional home gym is 400 square feet with room to move freely. But don't panic if you're working with less. A dedicated 10x10 bedroom can accommodate a squat rack, cardio equipment, and floor work space if you're strategic about layout.
-
Clearance zones: Map out where doors swing, where outlets are located, and any obstructions like support columns or low-hanging lights. You need clear zones around equipment for loading plates, explosive movements, and emergency bailouts during heavy lifts.
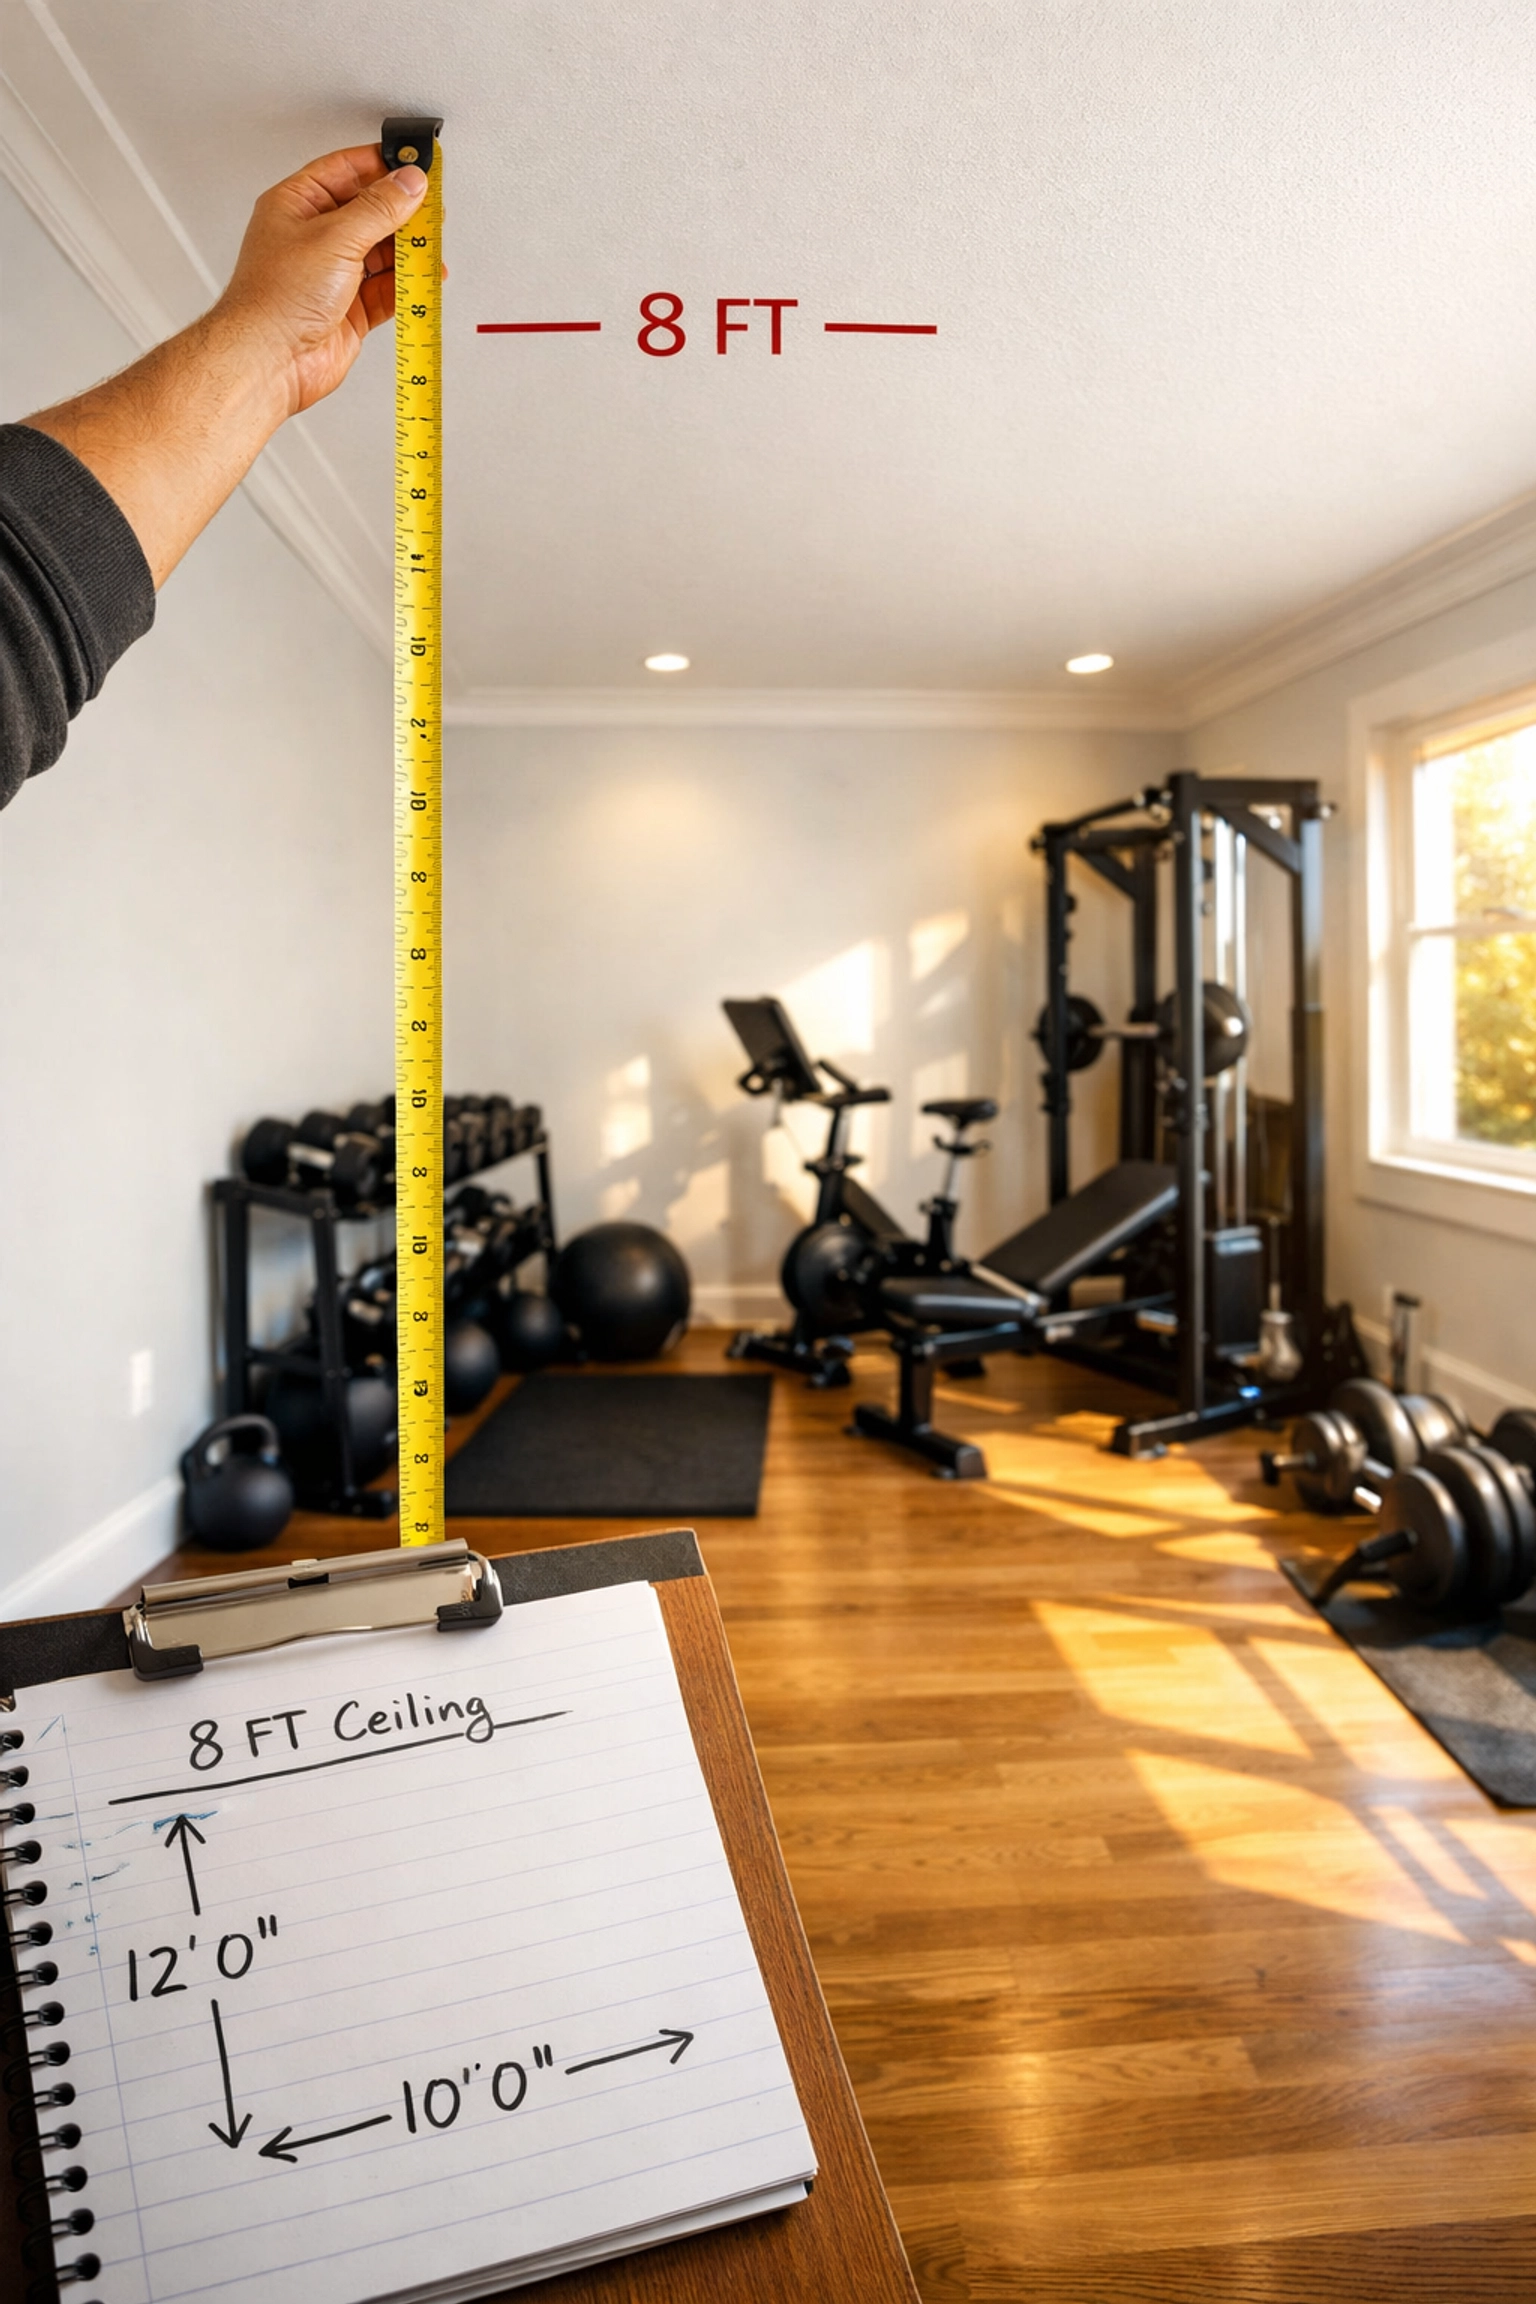
Pro tip: If you're installing a floor-to-ceiling system like the Resistance Rail from Bold Body Fitness, measure the exact distance between your floor and ceiling. These tension-mounted systems require precise measurements for safe installation and maximum stability: there's no room for "eyeballing it."
Step 2: Protect Your Investment with Commercial-Grade Flooring
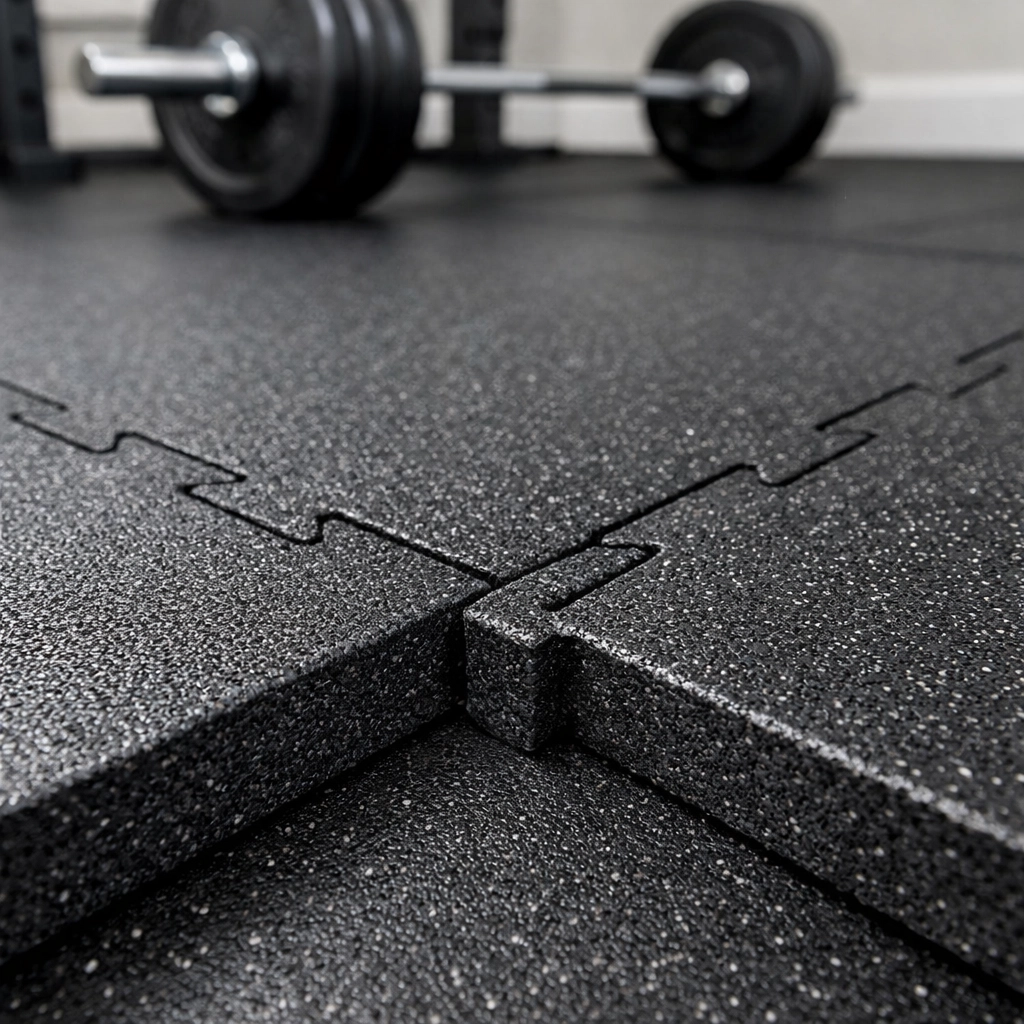
Your flooring is the foundation of everything. Skip this step and you'll regret it the first time you drop a barbell, damage your subfloor, or deal with noise complaints from downstairs neighbors.
Go commercial-grade or go home. Literally.
Rubber flooring is non-negotiable for serious training. Horse stall mats (typically 4x6 feet and 3/4-inch thick) are the budget-friendly option that works for 90% of home gyms. They're indestructible, absorb impact, reduce noise, and protect both your floor and your equipment.
If you're doing Olympic lifts, snatches, or any movement where you're dropping loaded barbells from overhead, build or buy a dedicated lifting platform. Standard setup: two layers of plywood topped with rubber mats in the drop zones and a center strip of hardwood for stable footing during lifts.
Minimum flooring coverage:
- Full rubber coverage for dedicated training spaces
- Individual mats under treadmills, benches, and squat racks for smaller setups
- Extra padding (double-thick mats) in Olympic lifting zones
The investment pays off immediately. You'll train with more confidence, protect your home's structure, and eliminate the anxiety of every rep potentially damaging something expensive.
Step 3: Choose Your Anchor System (The Floor-to-Ceiling Advantage)
Here's where most home gym guides miss the mark. They focus on squat racks and power cages: which are great if you have space, budget, and don't mind drilling into walls or ceilings. But there's a smarter option for versatile training: floor-to-ceiling tension systems.
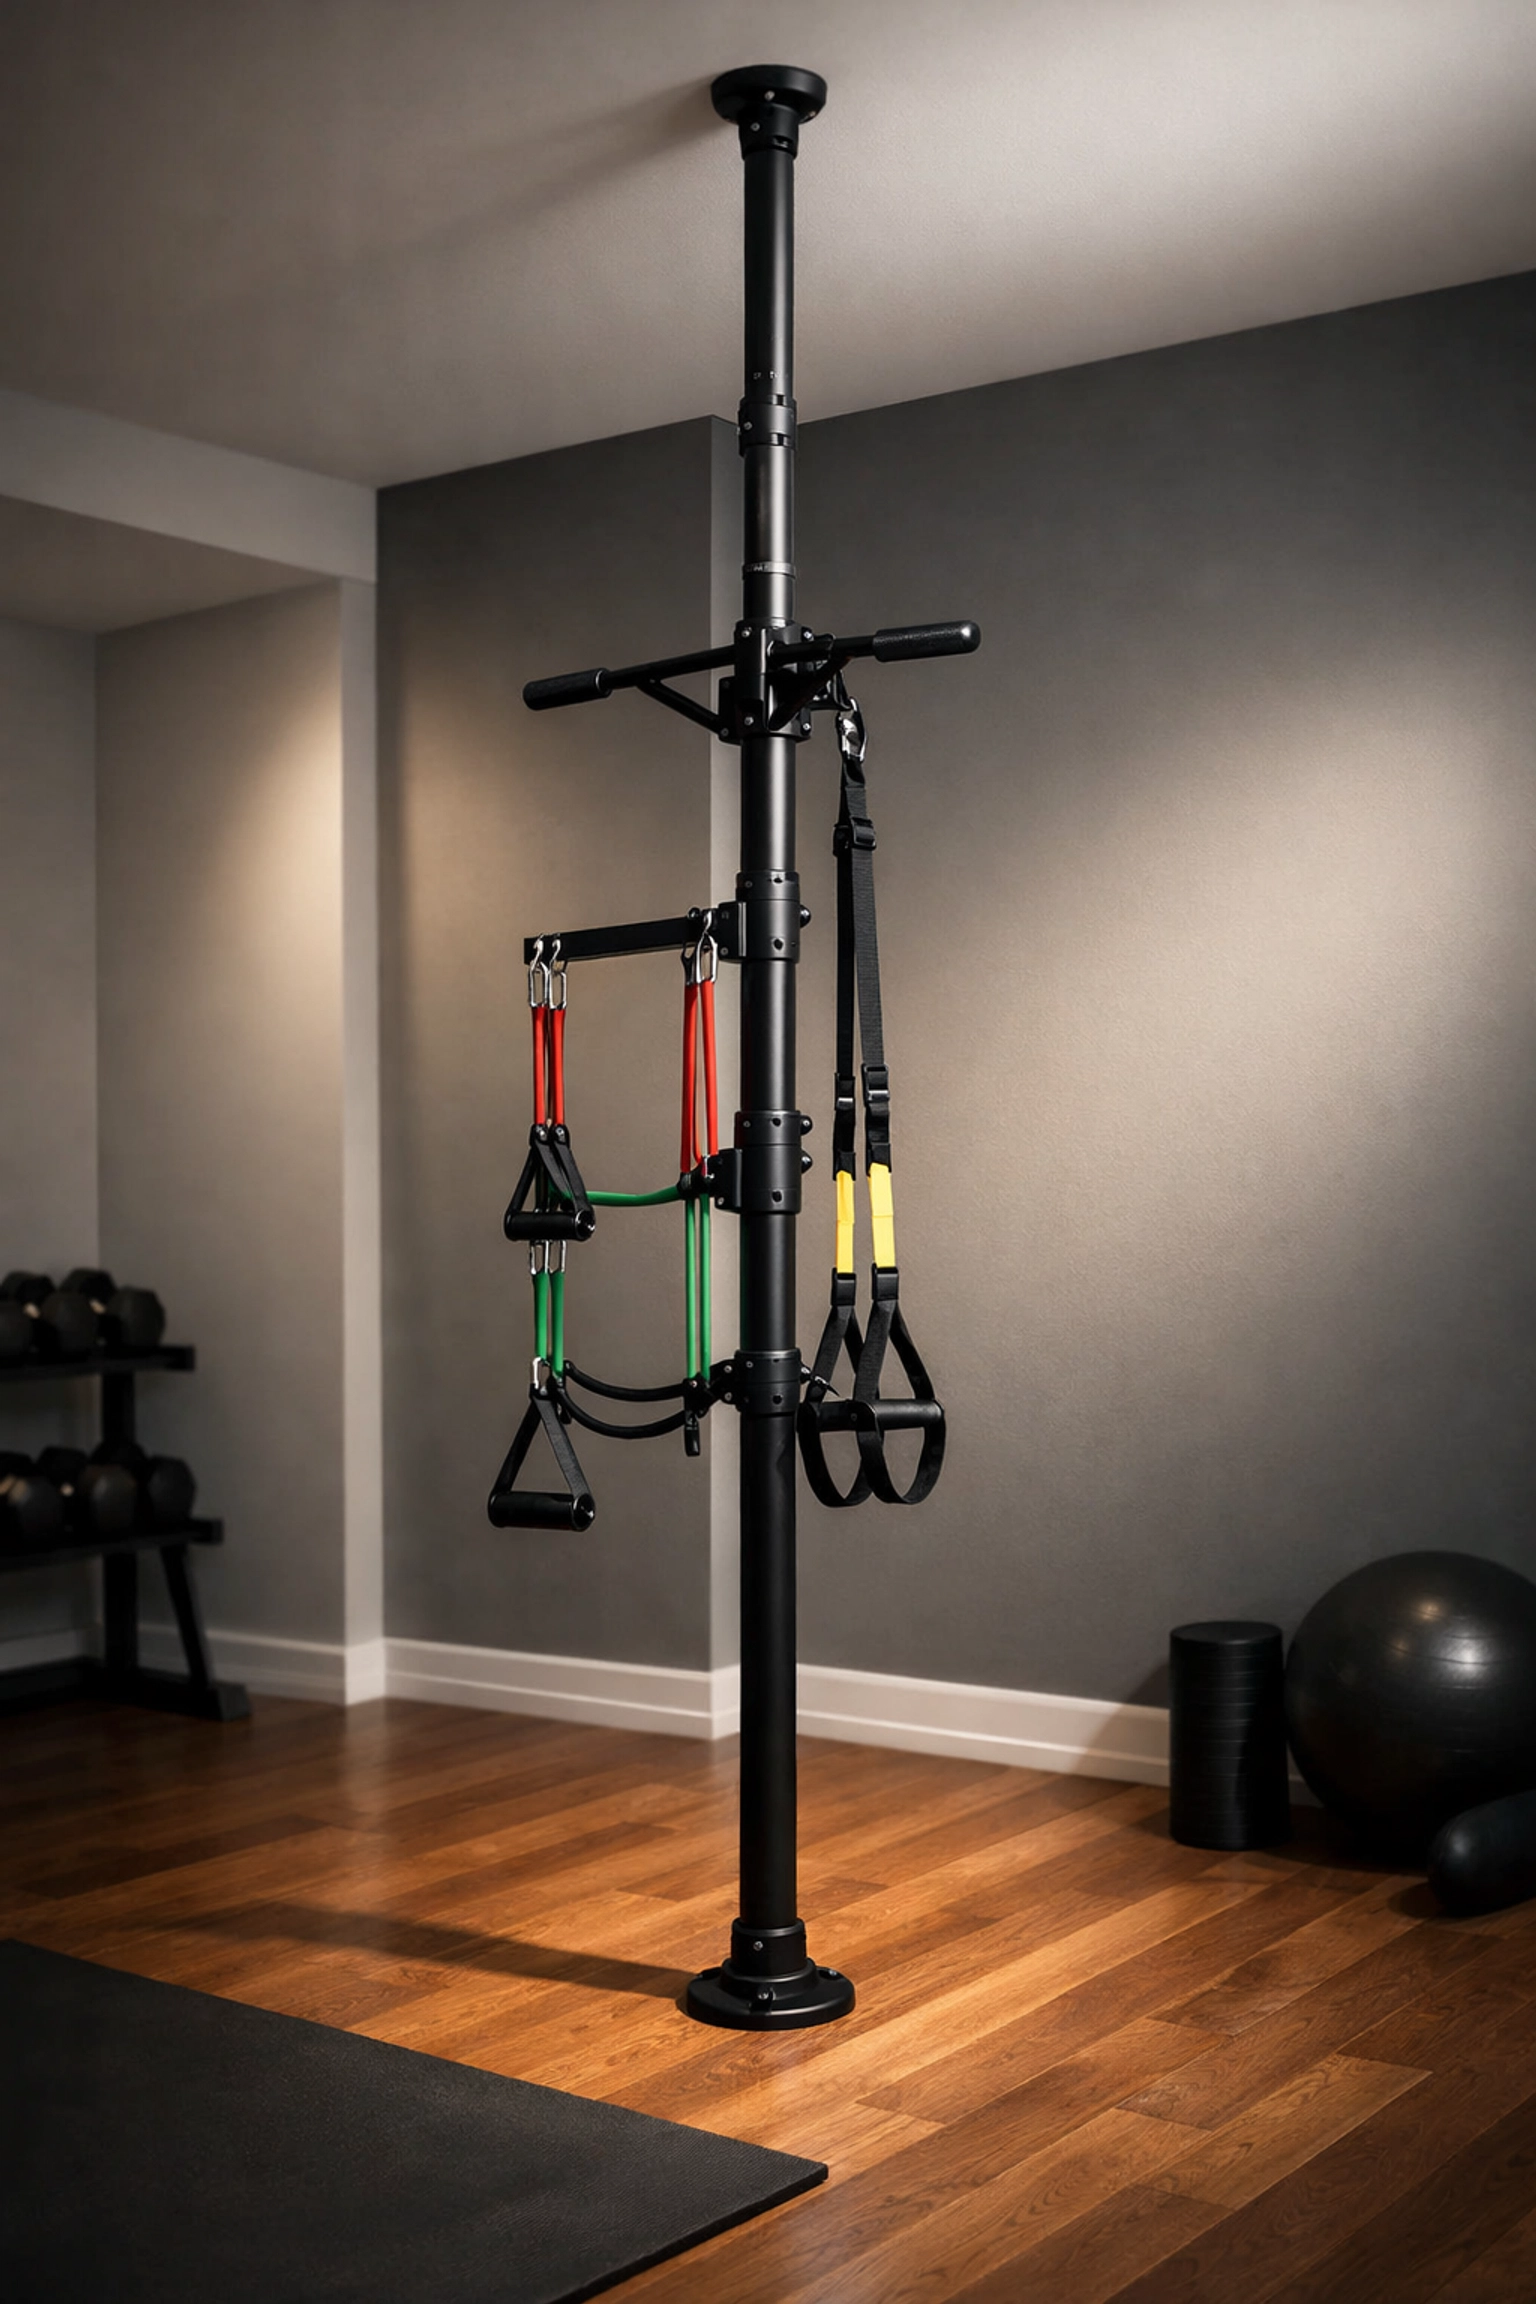
A floor-to-ceiling gym setup uses vertical poles that mount between your floor and ceiling using tension: no drilling, no permanent installation, no landlord headaches. This is the ultimate solution for renters, multi-use spaces, or anyone who wants gym-quality training without turning their home into a permanent fitness warehouse.
The Bold Body Fitness Resistance Rail is the gold standard here. It's a vertical training station that transforms any room into a full-body workout zone. Mount resistance bands at any height. Add pull-up bars. Attach suspension trainers. Practice rope climbs. The versatility is unmatched.
Why floor-to-ceiling systems dominate for serious athletes:
For CrossFit athletes: You need flexibility to switch between strength work, gymnastics movements, and metabolic conditioning. A tension-mounted system lets you configure your setup for whatever the WOD demands: pull-ups in the morning, banded squats at lunch, rope climbs before dinner.
For MMA fighters: Ground-to-stand transitions, resistance band striking drills, and dynamic movement patterns require a training system that adapts quickly. Floor-to-ceiling setups give you that agility without sacrificing stability.
For gymnasts and calisthenics practitioners: Progressive calisthenics demands precise resistance adjustments and multiple grip positions. Vertical rail systems offer infinite height adjustments for assisted movements, band work, and skill progressions that wall-mounted bars can't match.
For ninja warriors: Grip strength, dynamic movements, and obstacle-specific training all benefit from a versatile anchor point that can handle multiple attachments and training angles.
If you're committed to traditional power racks, choose based on your space constraints. Squat stands save floor space. Four-post power racks are the standard for serious barbell work. Six-post racks add storage for plates and accessories but eat up significant real estate.
Step 4: Build Your Equipment Arsenal (Smart, Not Stupid)
Now comes the fun part: selecting equipment. But here's the reality check: you don't need everything on day one. Start with foundational pieces that cover multiple training modalities, then scale up as your goals evolve.
The Core Foundation (Start Here):
Strength training essentials:
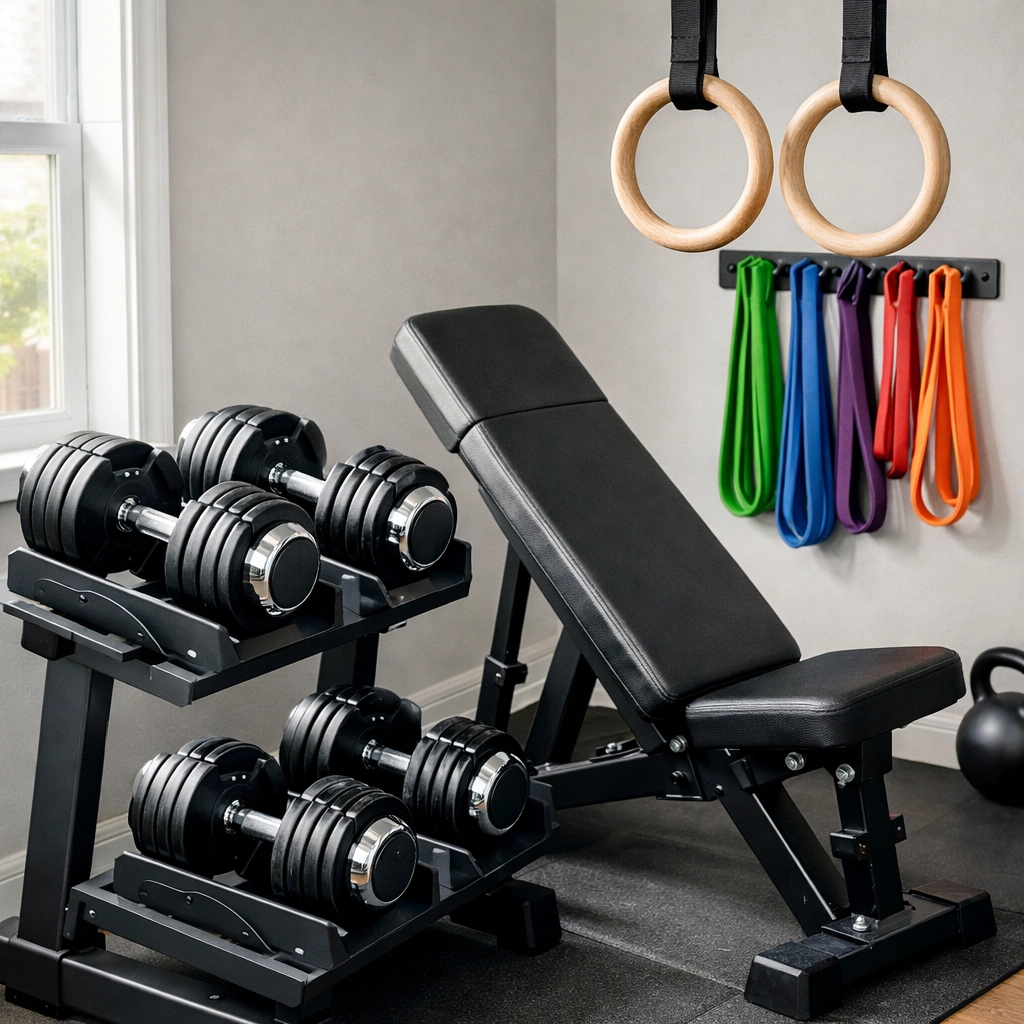
- Adjustable dumbbells (5-50 lbs minimum for most athletes)
- Barbell with Olympic weight plates if you're serious about lifting
- Adjustable bench (flat, incline, decline capability)
- Resistance bands (various tensions for mobility, warm-ups, and assistance work)
Bodyweight training tools:
- Pull-up bar or floor-to-ceiling system with pull-up attachments
- Gymnastics rings (arguably the most versatile piece of equipment ever created)
- Parallettes for dip work and handstand training
Cardio options (pick one based on goals):
- Assault bike for metabolic conditioning and CrossFit-style work
- Rowing machine for full-body cardio with strength component
- Jump rope (the most underrated cardio tool: cheap, effective, takes zero space)
- Treadmill only if running is central to your training (requires dedicated outlet)
Flexibility and recovery:
- Foam roller (standard and textured)
- Yoga mat for floor work and stretching
- Lacrosse ball for targeted trigger point work
The beauty of systems like the Resistance Rail is how they consolidate multiple pieces of equipment into one versatile station. Instead of buying separate pull-up bars, suspension trainer mounts, and band anchor points, you get everything in a single floor-to-ceiling system. That's smarter training through better design.
Advanced additions (add these as you progress):
- Kettlebells for ballistic training and loaded carries
- Plyo boxes for jump training and step-ups
- Battle ropes mounted to your floor-to-ceiling system
- Climbing rope (if ceiling height permits)
- Sandbags for unconventional strength work
Start minimal. Add strategically. Every piece of equipment should serve multiple training purposes or you're just collecting expensive decorations.
Step 5: Optimize Your Training Environment (Power, Storage, and Performance)
You've got your space measured, flooring installed, anchor system mounted, and equipment selected. The final step is optimizing the environment for actual training performance.
Electrical infrastructure matters more than you think:
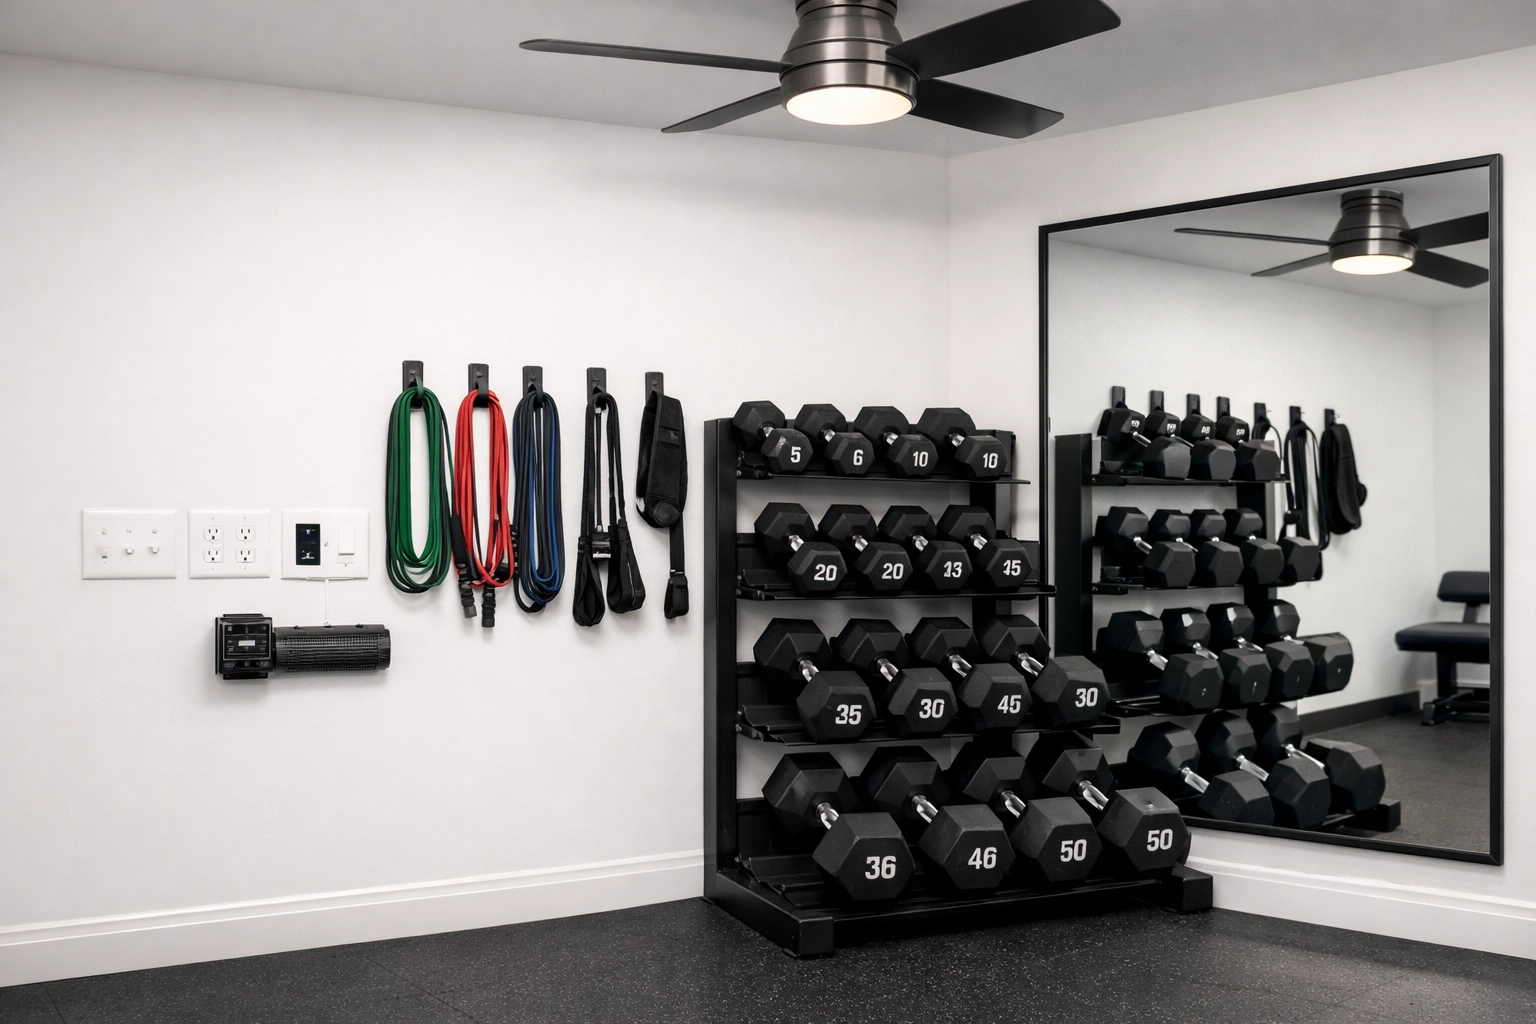
Most bedrooms have adequate outlets, but if you're building out a basement or garage gym, add extra outlets to avoid extension cord nightmares. Treadmills need dedicated wall outlets: their motors draw significant power and won't perform properly on power strips or extension cords.
Plan for at least one outlet on each wall of your training space. You'll need power for fans, speakers, phone charging, and potentially equipment like treadmills or stationary bikes.
Storage and organization:
Wall-mounted plate storage keeps weight plates organized and off the floor. Dumbbell racks prevent tripping hazards and make weight selection faster between sets. Vertical storage solutions (hooks, shelves, pegboards) maximize your usable training space.
For floor-to-ceiling systems like the Resistance Rail, use the vertical space for hanging resistance bands, suspension trainers, and accessories. Everything stays organized, accessible, and out of the way when not in use.
Climate and comfort:
Proper ventilation is non-negotiable. Install fans for air circulation: you'll overheat fast during intense training sessions without airflow. Natural light boosts energy and mood, so set up near windows when possible. If you're in a basement or windowless room, invest in bright, full-spectrum lighting that mimics daylight.
Temperature control matters year-round. Space heaters for winter training, fans or portable AC units for summer sessions. Your body performs better when the environment supports it, not fights it.
Audio and motivation:
Quality speakers or a solid Bluetooth system turn your training space into a performance zone. Music selection impacts training intensity: science backs this up. Create playlists that match your workout intensity and watch your performance improve.
Mirror placement (optional but valuable):
Wall mirrors aren't just for vanity. They provide real-time form feedback for lifts, calisthenics progressions, and movement patterns. Position mirrors to see yourself during key exercises without cluttering your entire training space.
The No-Drill Advantage: Why Renters and Smart Homeowners Choose Floor-to-Ceiling Systems
Traditional home gym setups require permanent modifications: drilling into studs, ceiling joists, and wall framing. That's fine if you own your home and plan to stay put. But for renters, military families, or anyone who values flexibility, permanent installations are a deal-breaker.
Floor-to-ceiling tension systems like the Resistance Rail eliminate this problem entirely. They mount using compression between floor and ceiling: rock-solid stability without a single screw hole. When you move, they break down in minutes and set up just as fast in your new space.
This isn't a compromise on quality. Properly installed tension systems handle hundreds of pounds of force safely. They're engineered for serious training, not casual exercise. The difference is you're not locked into one configuration or one location forever.
For serious athletes training at home, this flexibility is a game-changer. Your training environment adapts to your life instead of forcing your life around a permanent gym setup.
From Empty Room to Elite Training Station
Building a floor-to-ceiling home gym isn't about buying the most equipment or copying what you see on Instagram. It's about creating a functional training environment designed for your specific goals with equipment that serves multiple purposes and a layout that maximizes every square foot.
Follow these five steps, start with quality foundational equipment, and scale intelligently as your training evolves. Whether you're working with a spare bedroom, converted garage, or dedicated training space, the principles stay the same: measure precisely, protect your floors, choose versatile equipment, and optimize your environment.
The athletes who train hardest aren't always in commercial gyms with endless equipment options. They're in focused, well-designed home training stations where every piece of equipment earns its place and every session moves them closer to their goals.
Ready to build your pro-level home gym? Start with the foundation that gives you maximum versatility without permanent installation headaches. Check out the complete Bold Body Fitness equipment lineup and transform your training space today.
Your gym. Your rules. Your results.